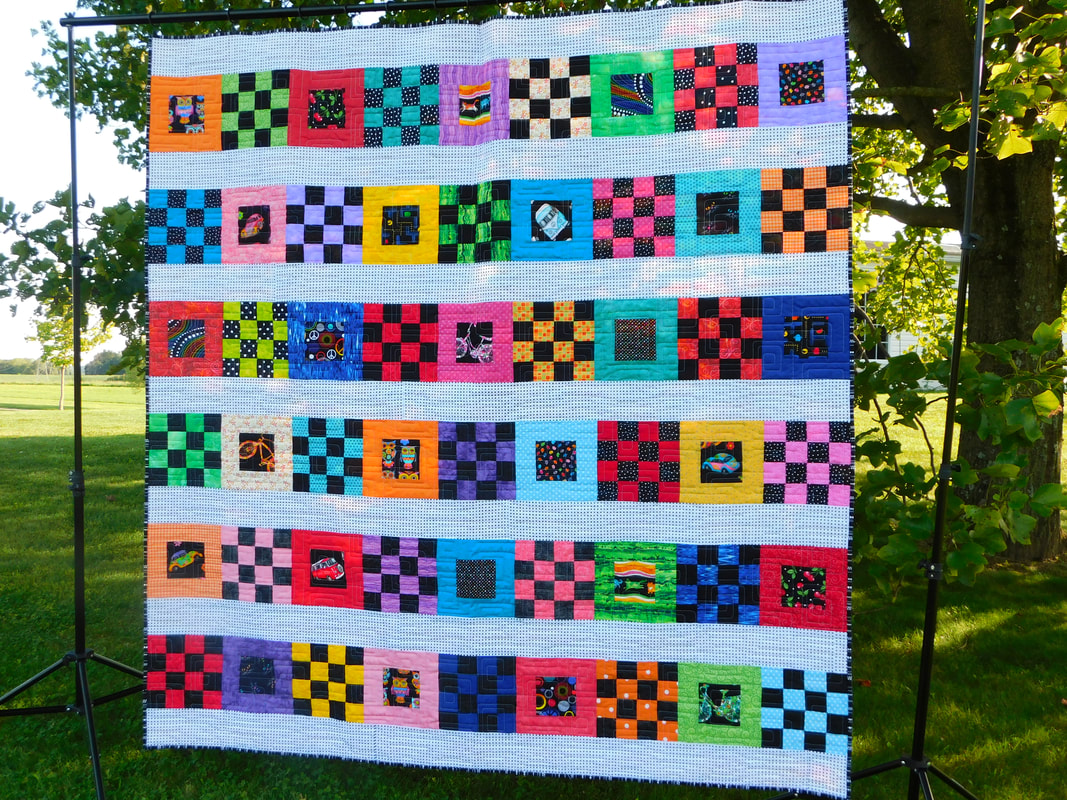
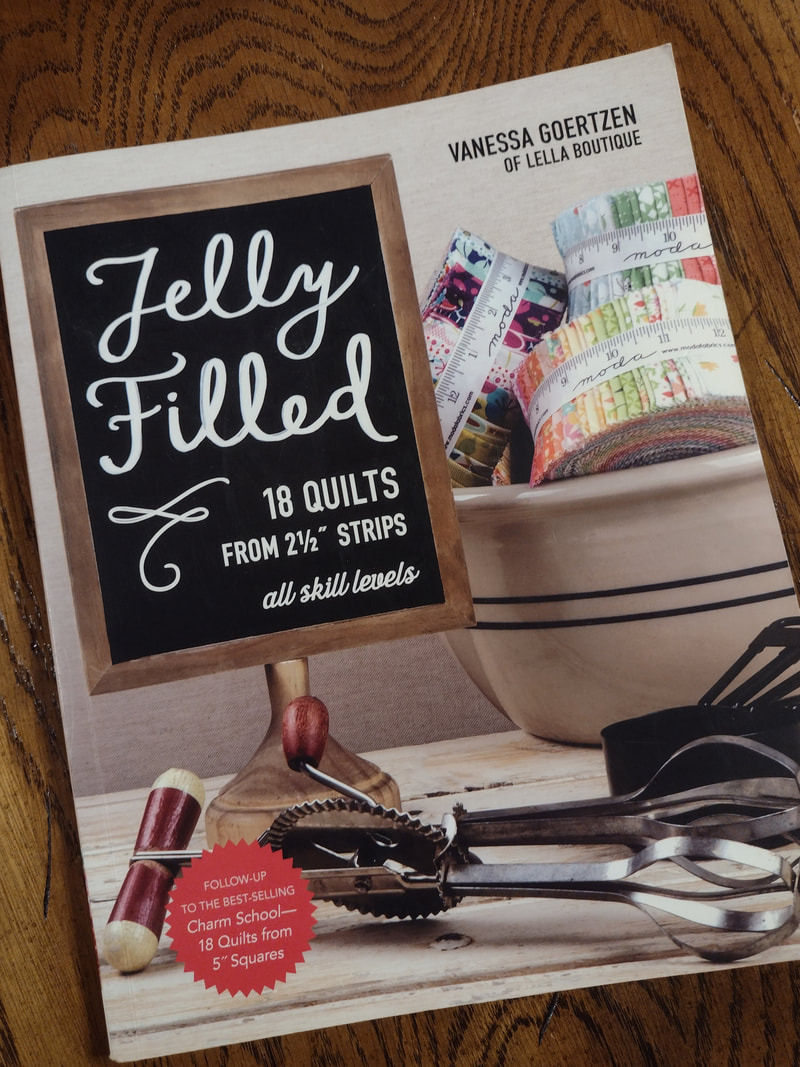
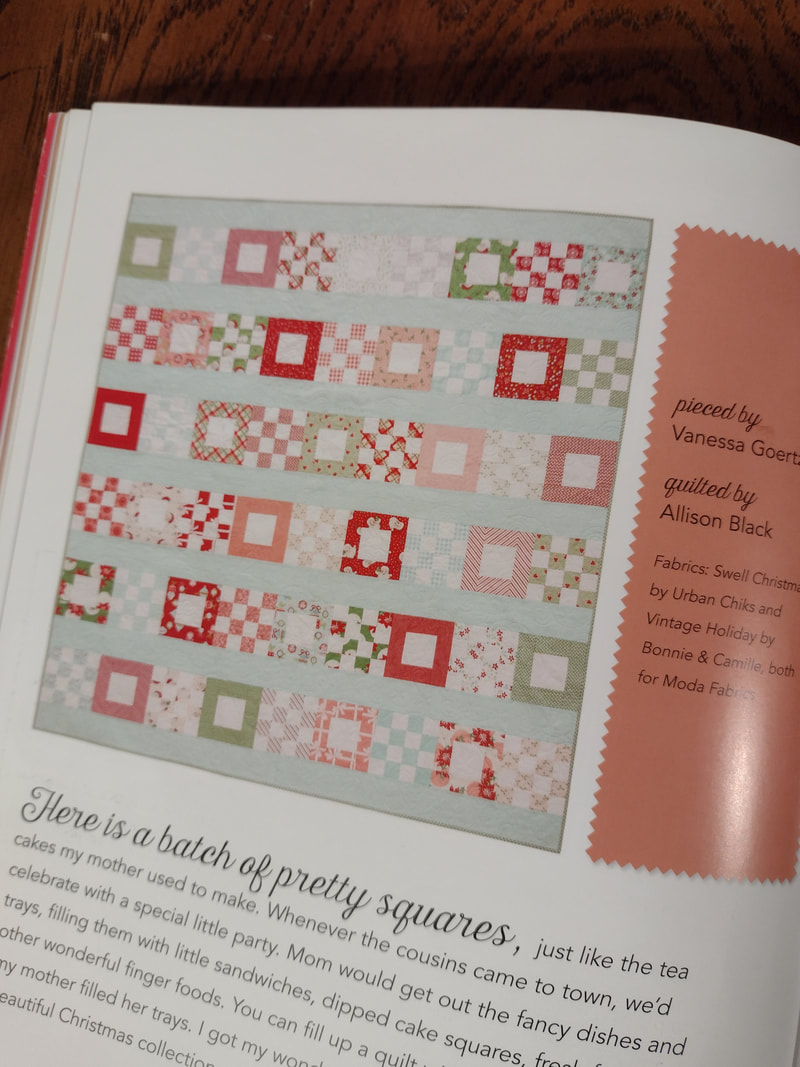
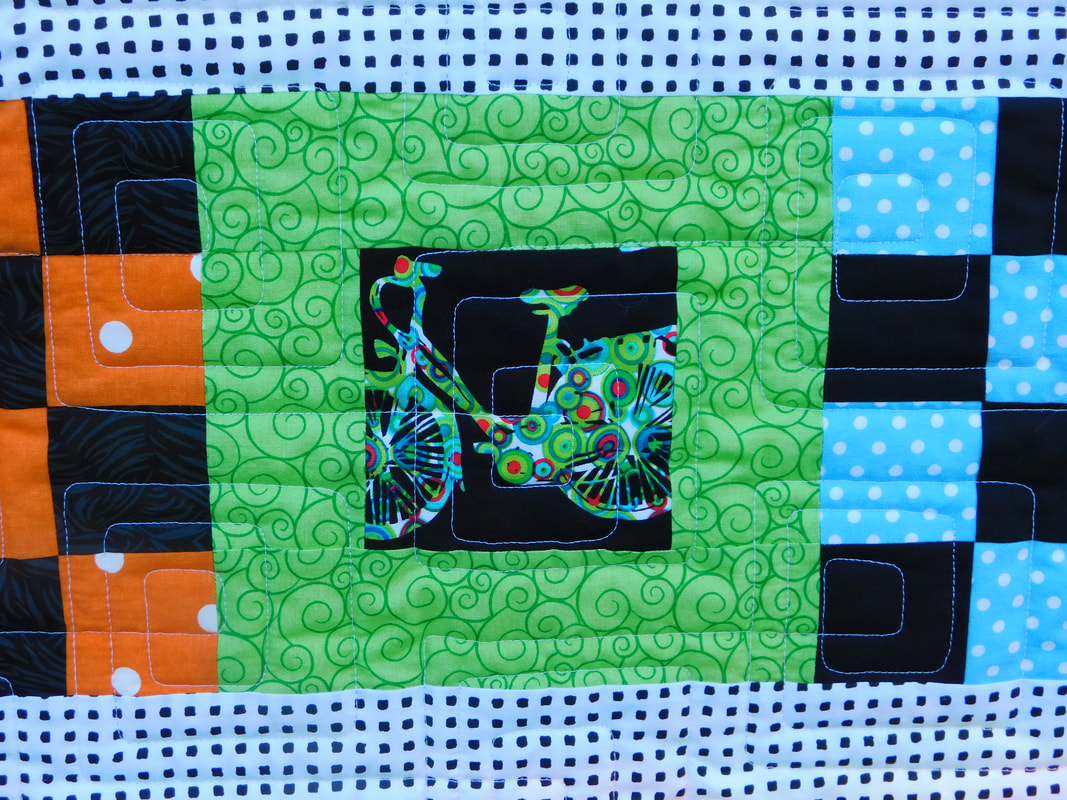
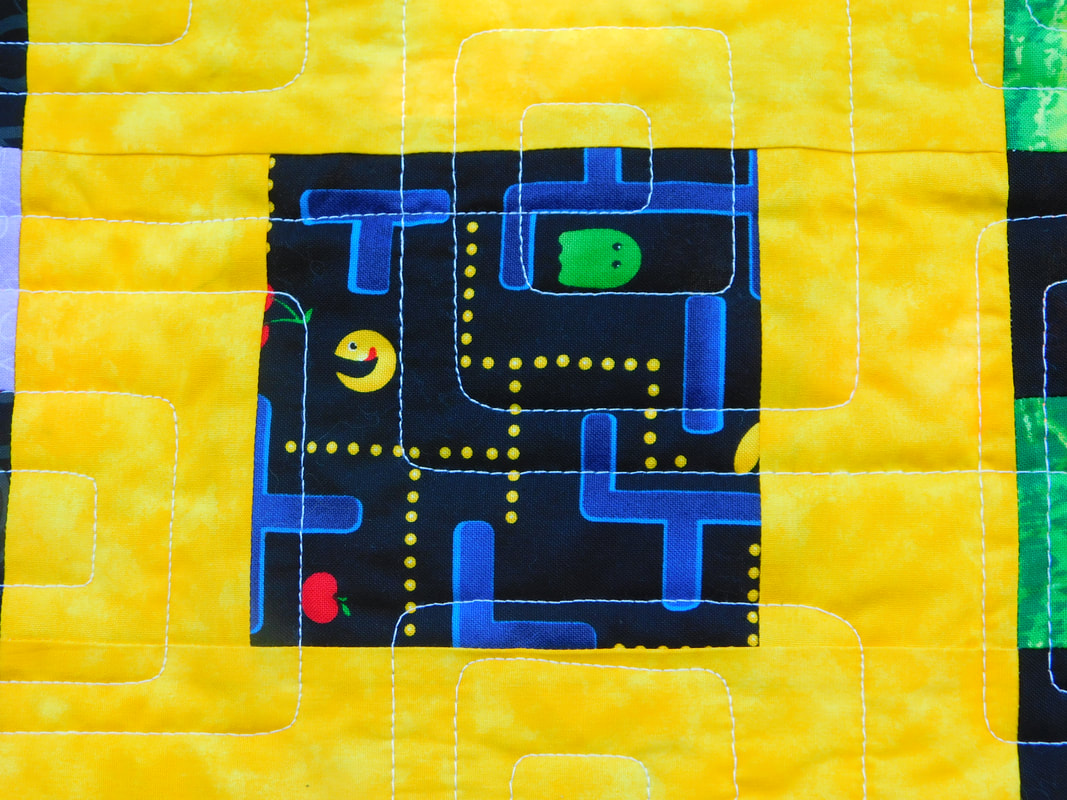
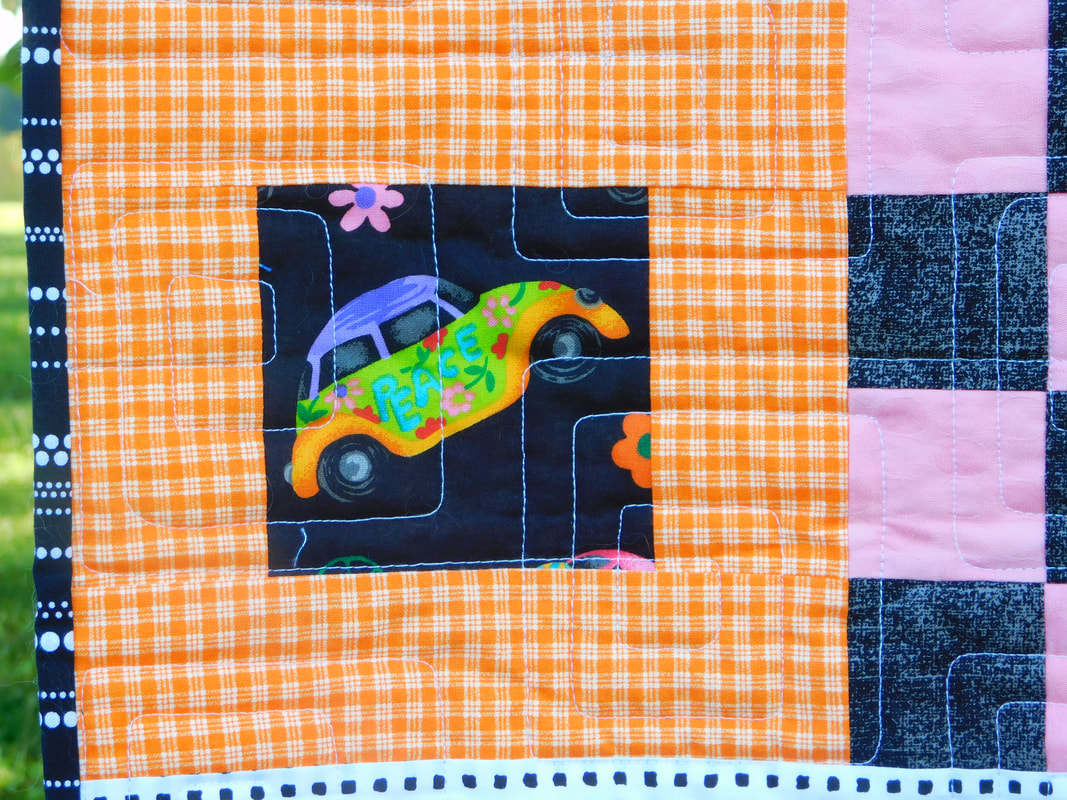
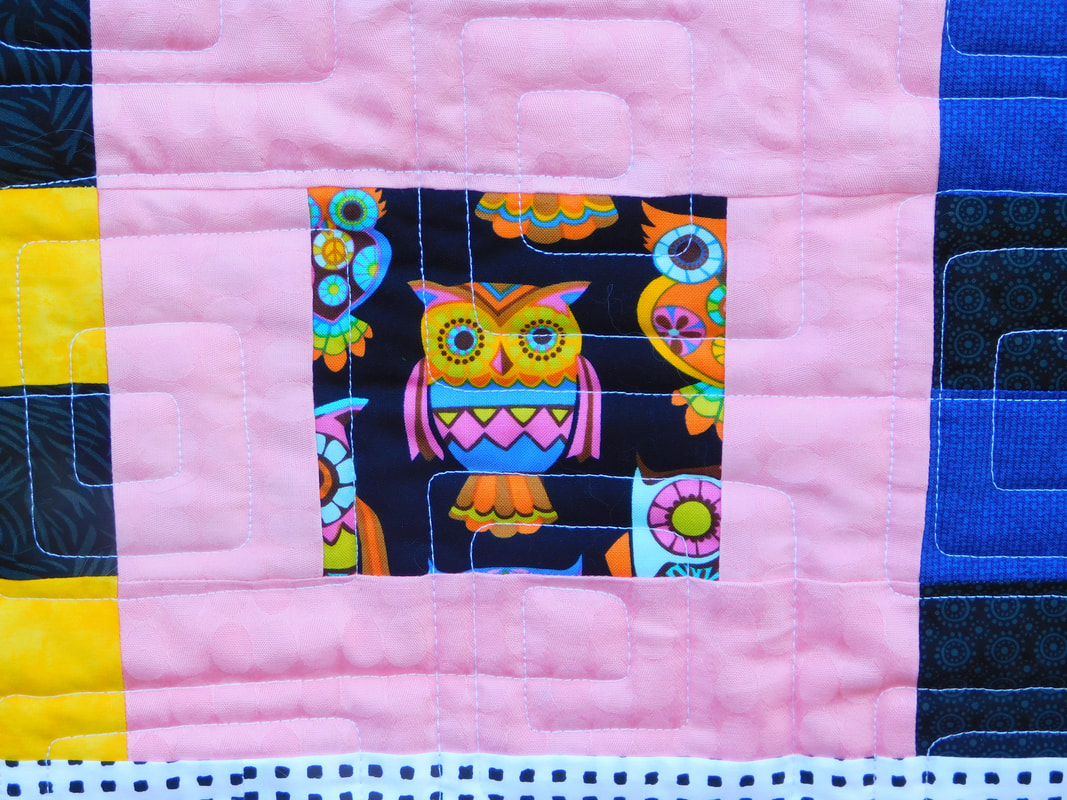
 I recently finished this quilt that I started in 2022. Actually I probably started thinking about making this quilt back in 2020 & 2021 when I decided to REALLY sort out my fabric stash. I had big tote boxes full of all kinds of fabric that were in no particular organized fashion after I had rooted through them over the years. Ugh! Some of this fabric was from the early 90s! I took everything out of the boxes and sorted them in color piles. This organization took almost a year for me to accomplish. I spent a good bit of time sitting and looking at these color stacks of fabric and considering what I could do with them. This is one of the quilts that came to life from my brainstorming.  One of my favorite quilt books and also most used quilt book is Jelly Filled by Vanessa Goertzen of Lella Boutique. I had quite a few bright, fun novelty prints that I thought would be perfect to showcase using the pattern "Petit Fours" from the book. Making checkerboard patches is pretty satisfying, and it was just a good time pairing up all of the fabrics. Everything came from my stash except the sashing strips between the rows. 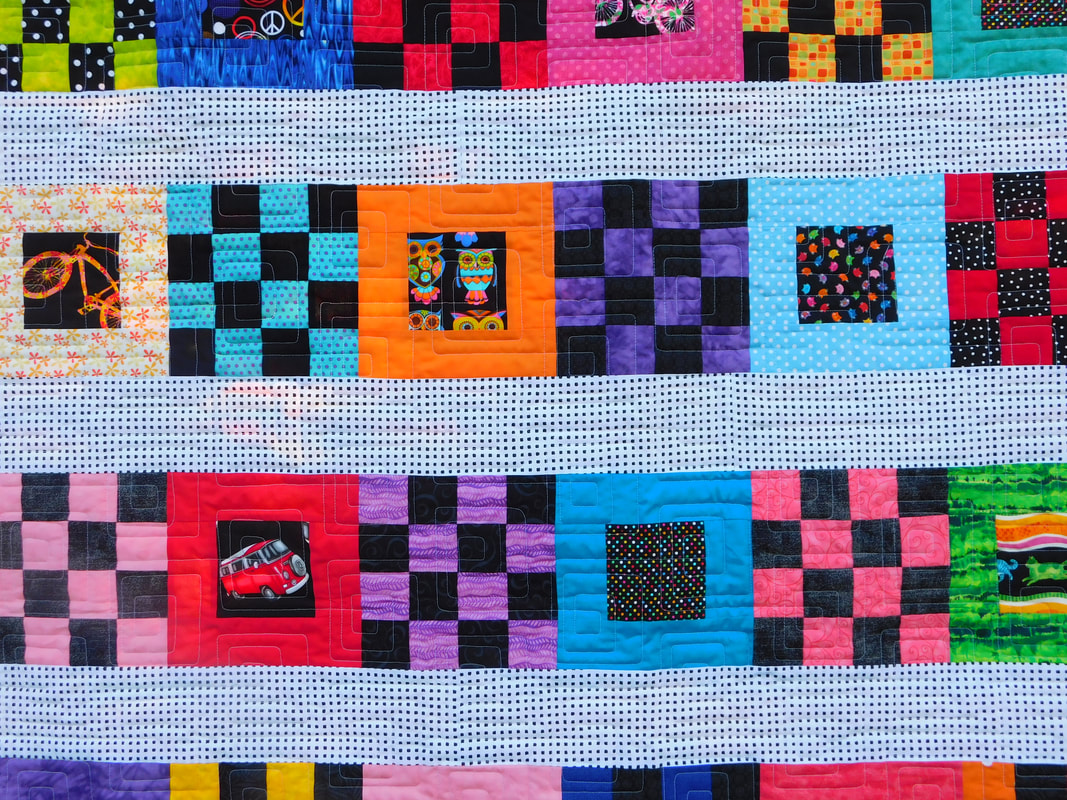 I quilted an edge-to-edge design called Bauhaus Baby, keeping with the square theme. I love the way it all came together! 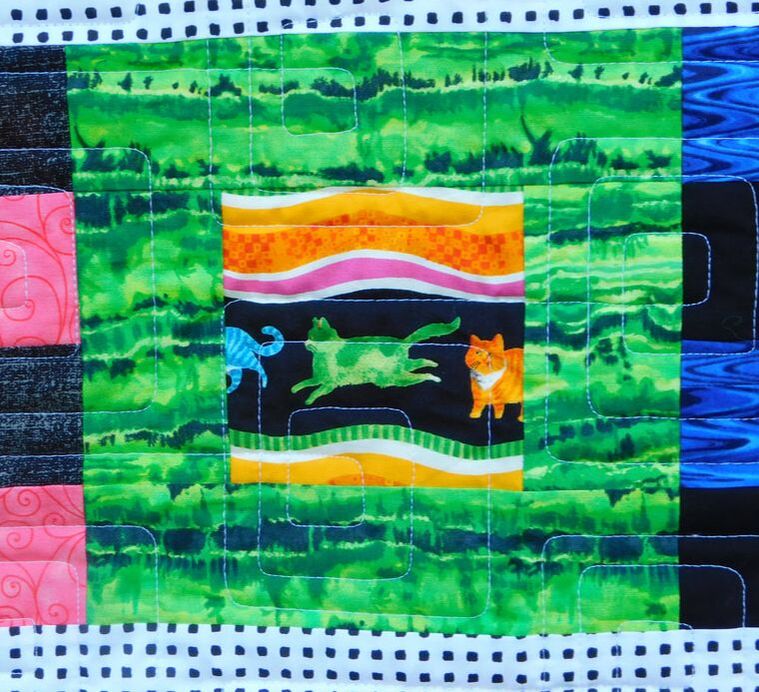 I can think of at least three other completed quilt tops waiting for their turn on the longarm that were also based on my old scrappy stash combined with Vanessa Goertzen's quilt patterns. Most of the remaining piles of fabric were cut into 2-1/2" strips so I can easily use them up. So much fabric and not enough time in the day! 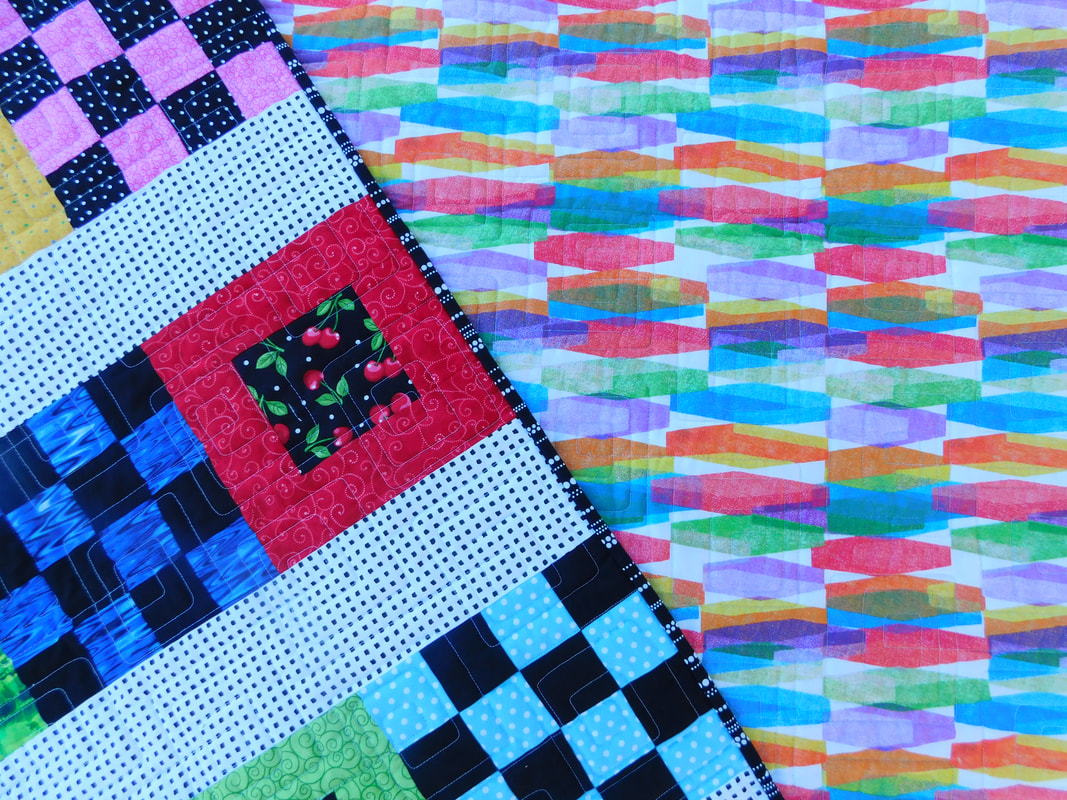 I had this very bold wide backing fabric in my collection, just waiting for an equally bold quilt top. What a match! This quilt is going to be donated, and I hope it makes someone smile. It was a pleasure to make. While I'm getting my quilt pattern business going, I'll have some more scrappy quilts to show off in the coming weeks. Please come back and visit soon! 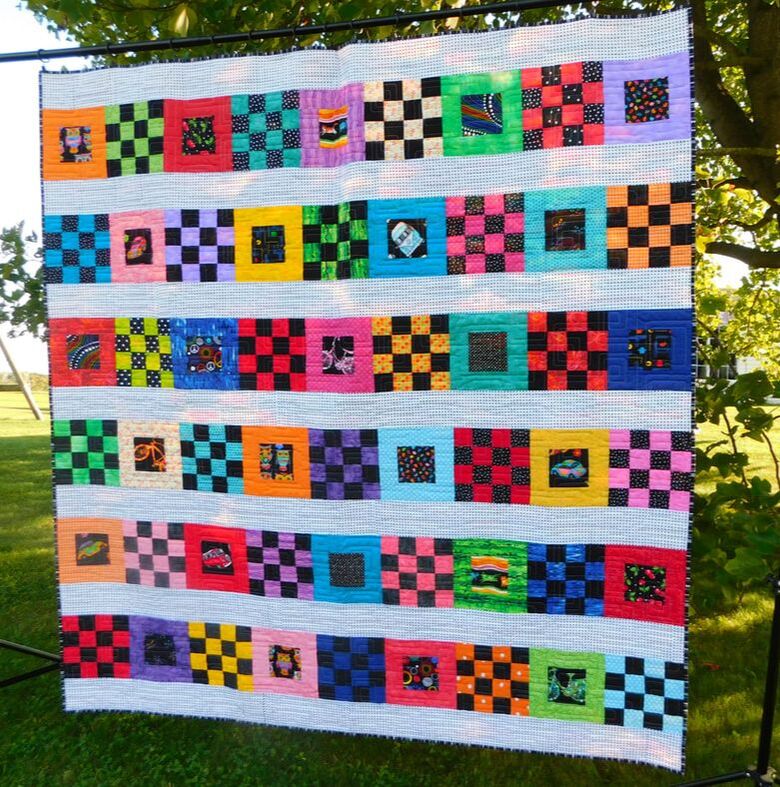
0 Comments
 Take a look at this beautiful quilt that my mom made! The pattern is called Ribbon Star from the Missouri Star Quilt Company. She worked on it with quilting friends at the Little Foot Quilt Shoppe, taught by Margaret.  Mom also worked on it at a quilt retreat back in February. (What a good time! Some of you ladies know what I'm talking about.) I did the longarm quilting with a light beige Glide thread and a feathery edge-to-edge pattern called Swift. 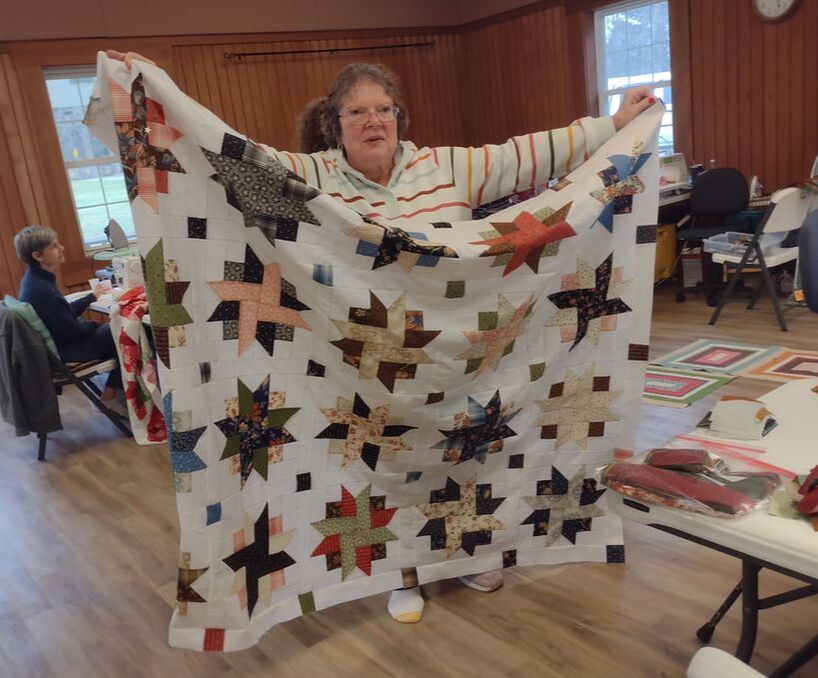 This quilt went to the park for some pretty pictures. 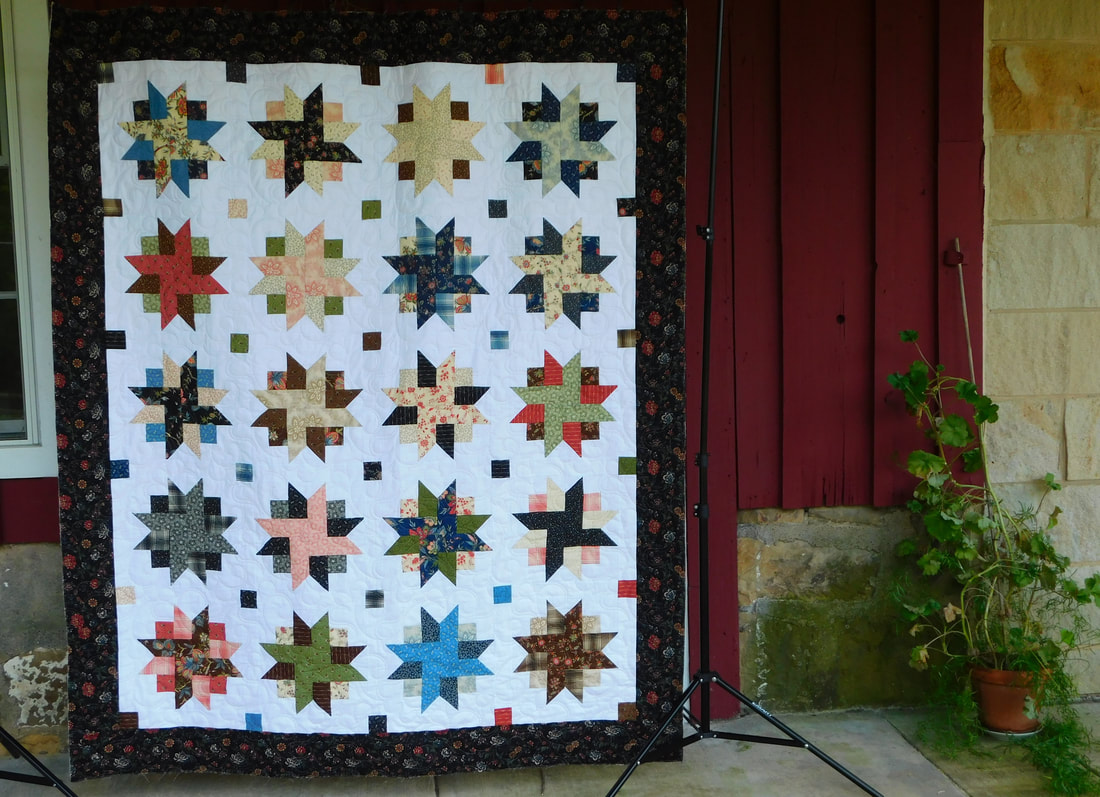  Thanks for visiting. Hope you enjoyed this lovely quilt! Come back soon for more inspiration!
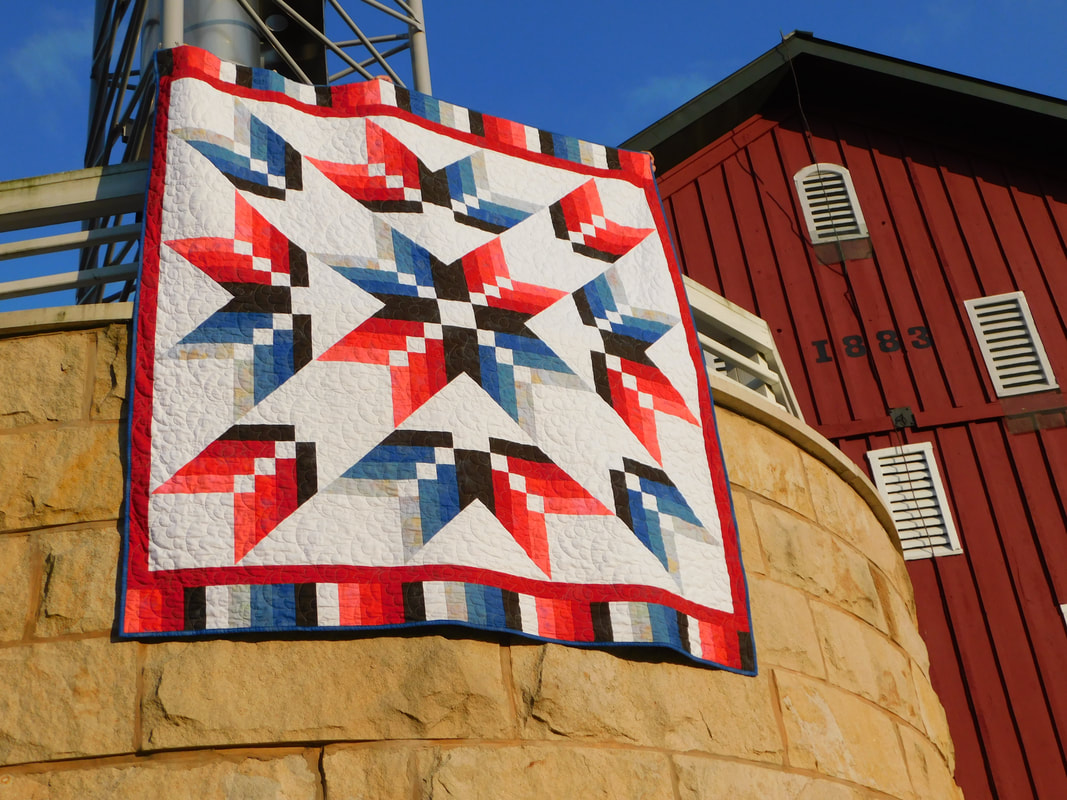 At the beginning of the year my daughter Lydia and I began talking about making a new quilt for her bed. She looked through my patterns and chose the Binding Tool Star pattern from Missouri Star Quilt Company. I have already made this pattern and knew that it would go together quickly. Lydia didn't want to do any sewing, but she did want to design it with her own color ideas. She's an artist! 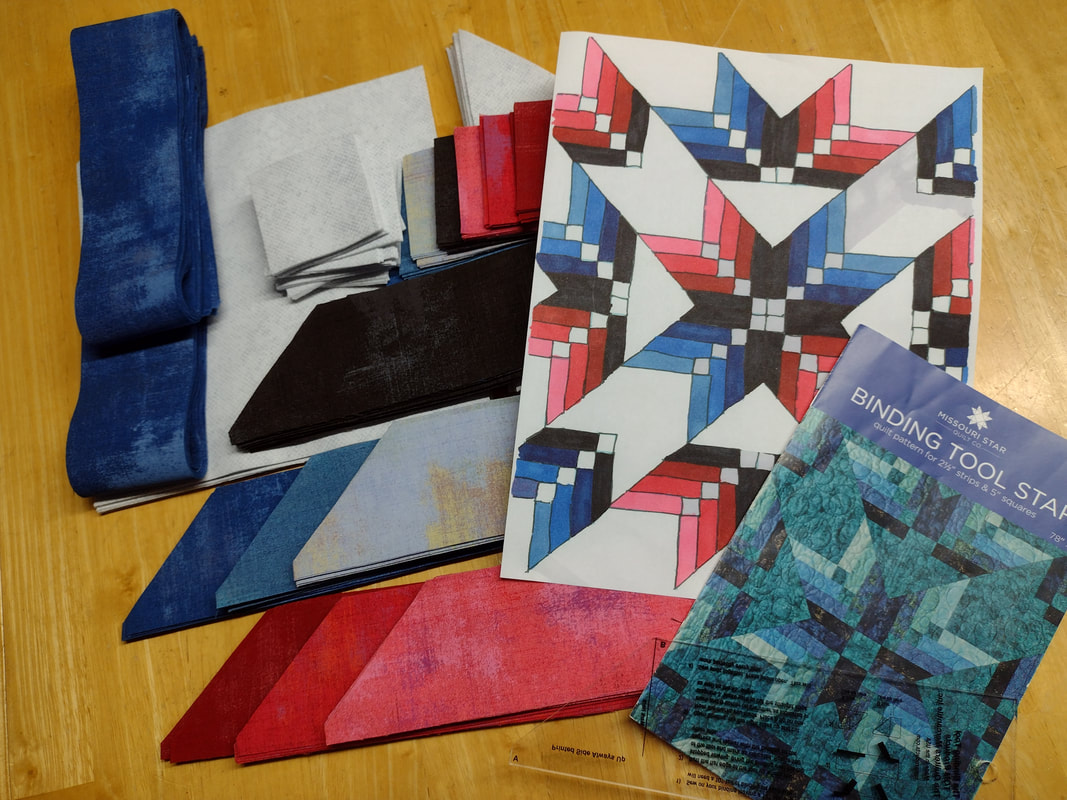 I got out some grid paper and drew the quilt out to make a coloring page. We printed out several copies, and Lydia got started with her designs. She knew what colors she wanted to use, and she experimented with different placement. This is the final version that she chose. I took her to the Little Foot Quilt Shoppe in Evans City, PA, and we began to look for fabrics that would work. Once she discovered the Moda Grunge, that was it! All the fabrics are Moda Grunge except for the background which is a white/gray with small cross hatching on it. I would never have chosen (mostly) all Grunge for one quilt. I love it as a blender or a background, but it is stunning in this quilt! 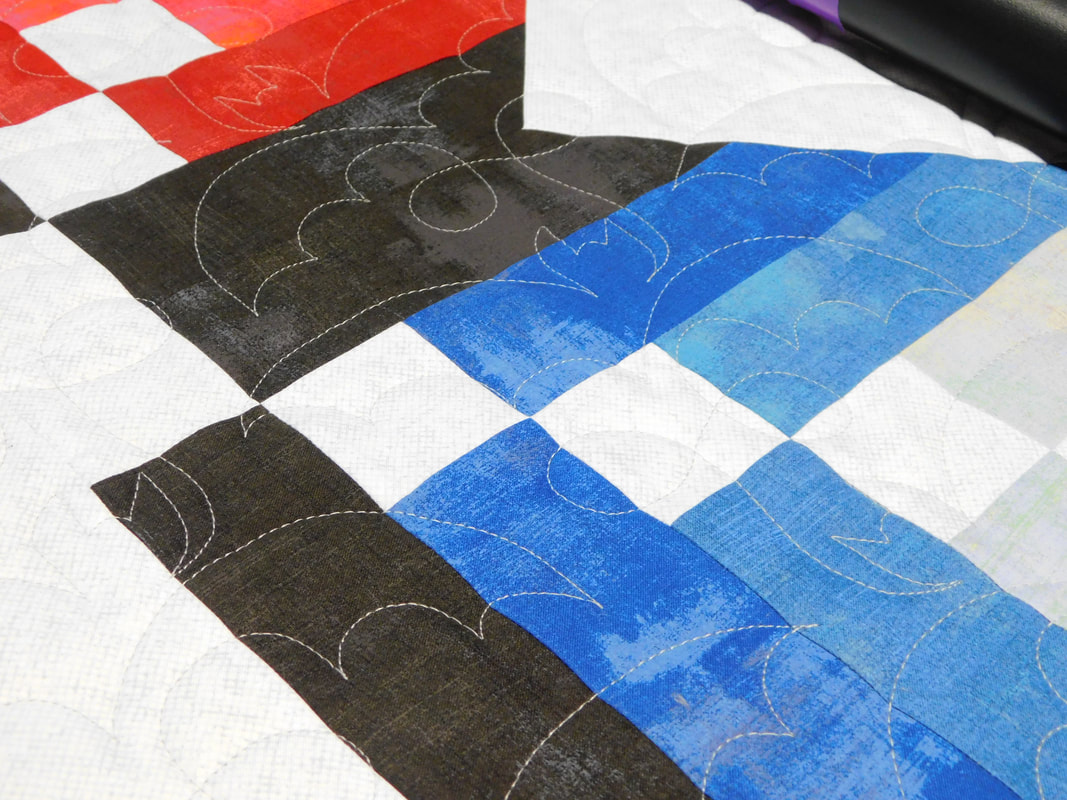 Lydia thinks bats are cool, and in all of my pantograph designs she found the Halloween bats. Again, that was a fast decision for her! The backing is gray Minky fabric. It's nice and soft! 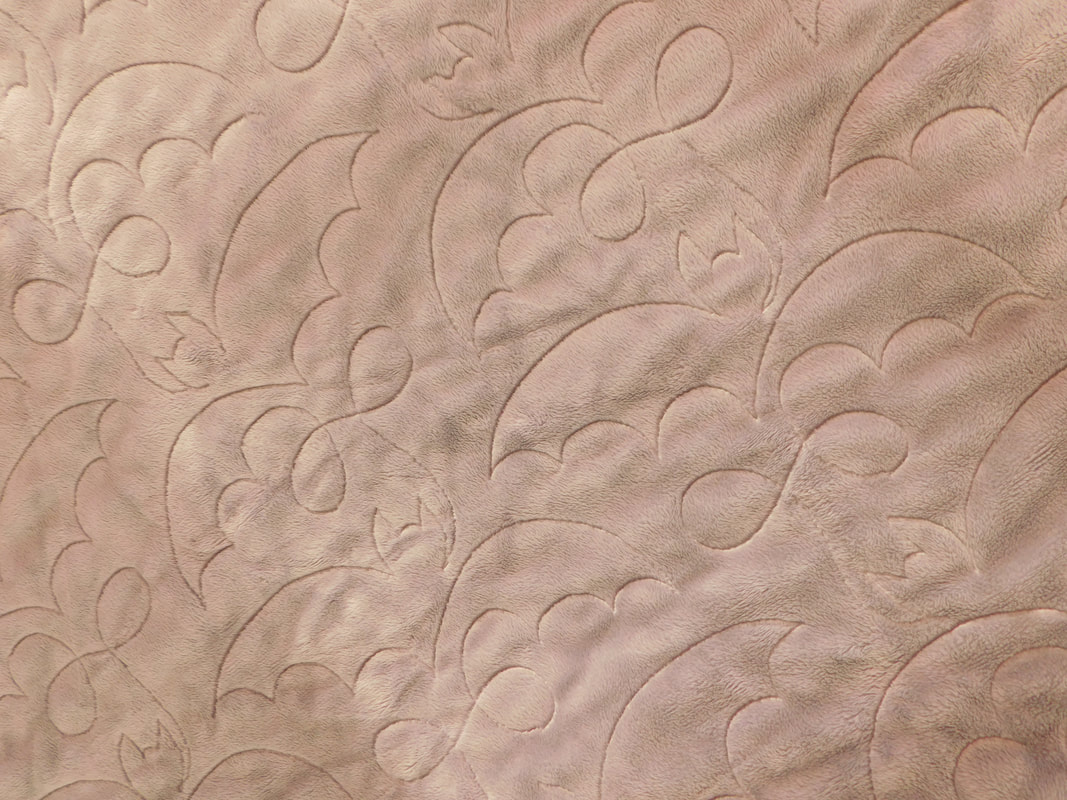 The quilt has been on Lydia's bed for months now, but just last week we took it out for a special photo shoot at a local nature park. We got some great shots! 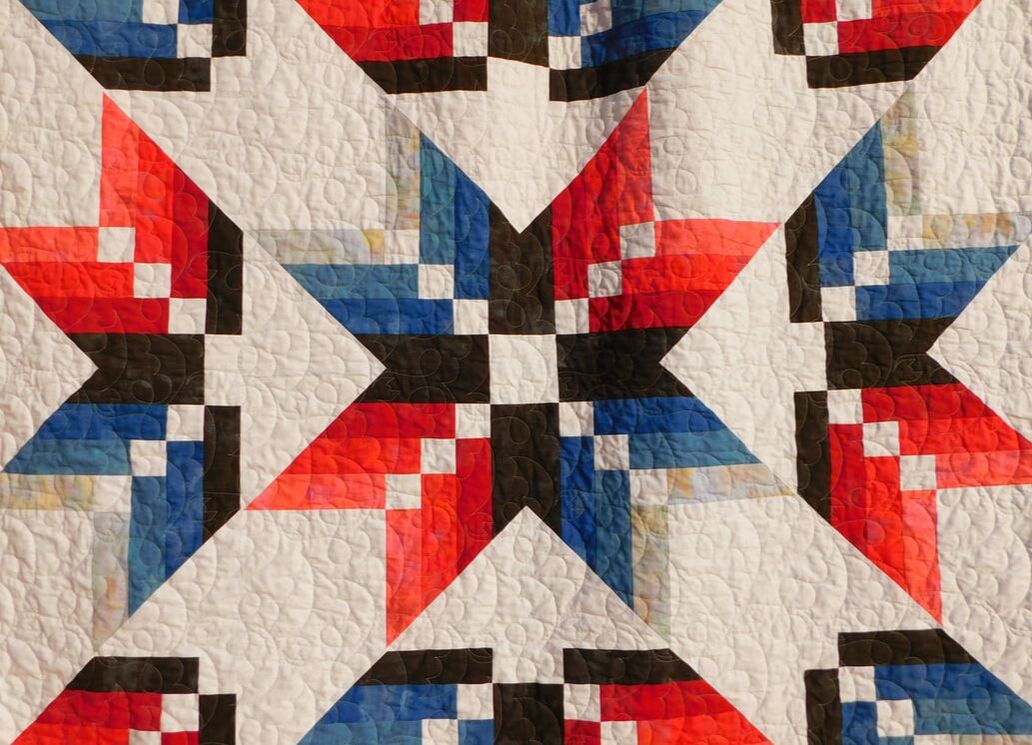 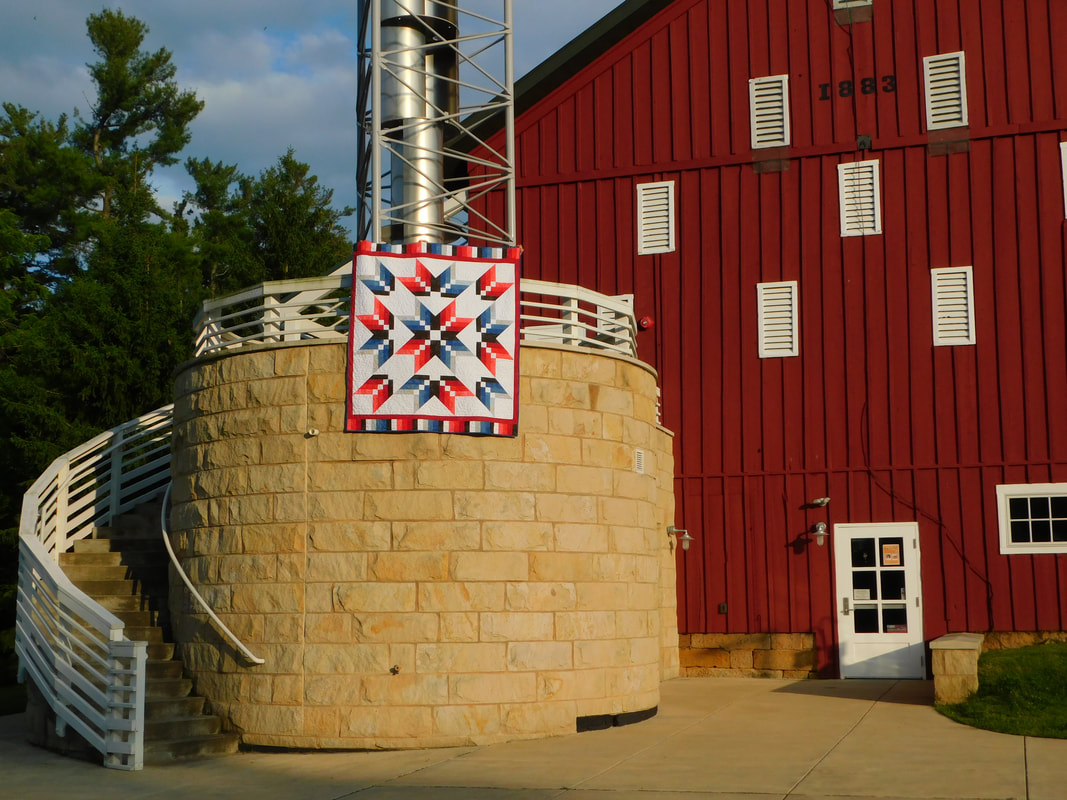 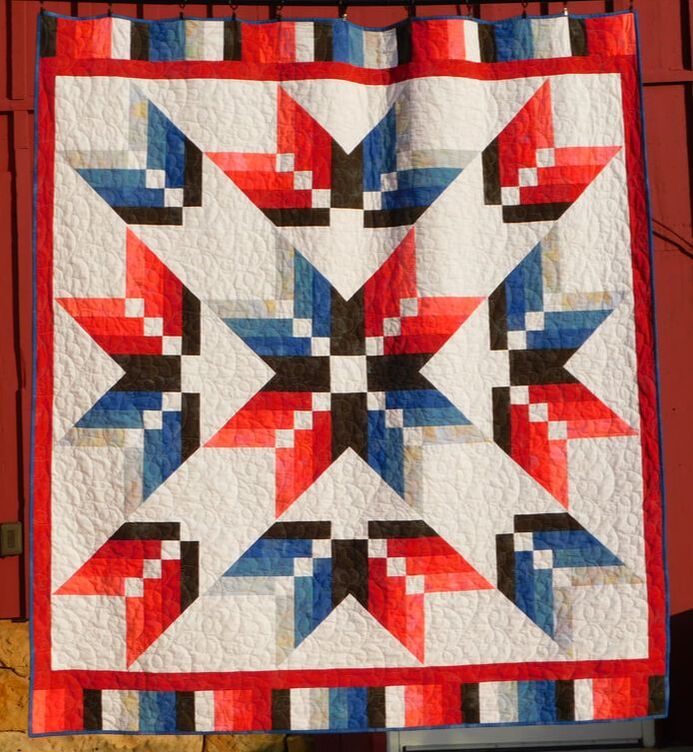 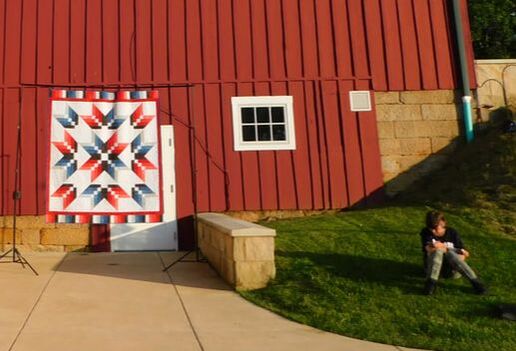 There's Lydia - not wanting to be in any pictures and wondering how long this is going to take. :-) I'm excited to go back to Succop Nature Park to photograph more quilts. It is a beautiful place!
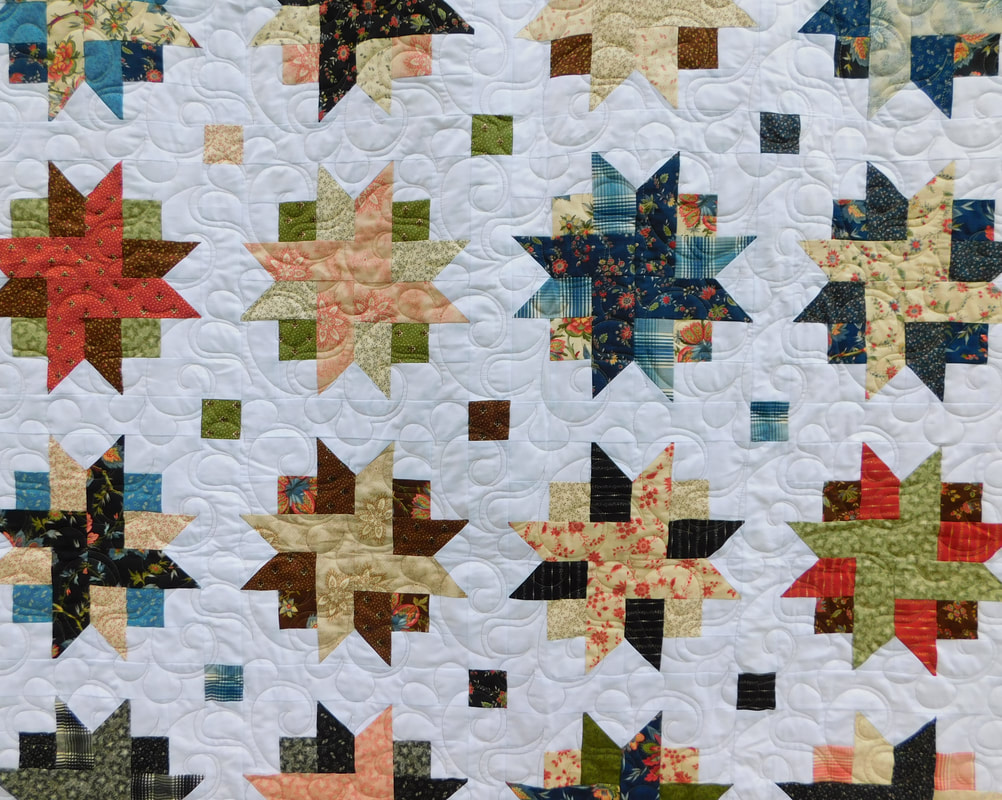
Thank you for visiting! Hope you were a little inspired. 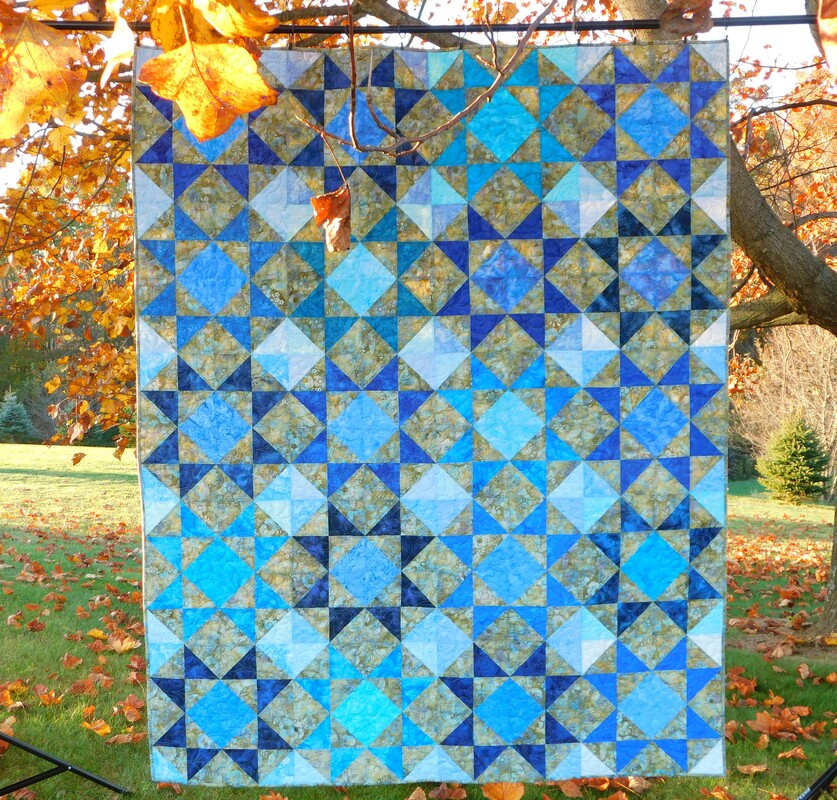 Hello! It's me sharing a new blog post with the world. It's been over a year since I've posted here, so let's see if I remember how to do this. I'm definitely very rusty! Last fall I completed this quilt and took some pictures of it on a beautiful autumn day. It just seemed to glow in the sunlight under our Tulip Poplar tree.  I had purchased this blue fabric many, many years ago at The Quilt Company. One of my favorite places on planet Earth was the batik room. I purchased the pack of 10" squares on clearance for around $15. Then several years later at their going-out-of-business sale I bought probably 4 yards of the brownish/greenish and blue fabric which I chose to coordinate with the 10" squares. It is an unusual combination, but it had all of the shades of blue and matched perfectly. I held onto it for even a few years more until I had just the right project in mind in 2022. 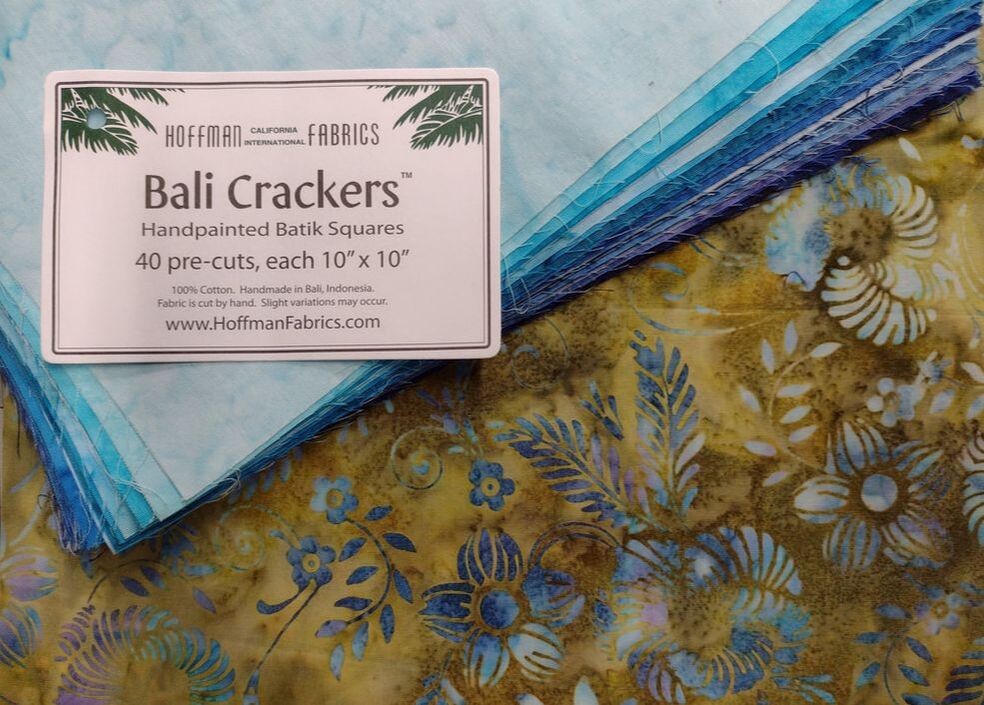 I had one more pad of the Cake Mix Recipe papers from Miss Rosie's quilt Co. stashed away also. I cut 10" squares with the yardage that I bought and stitched them up. After arranging them many different ways, this star block came out the winner. Perfect! 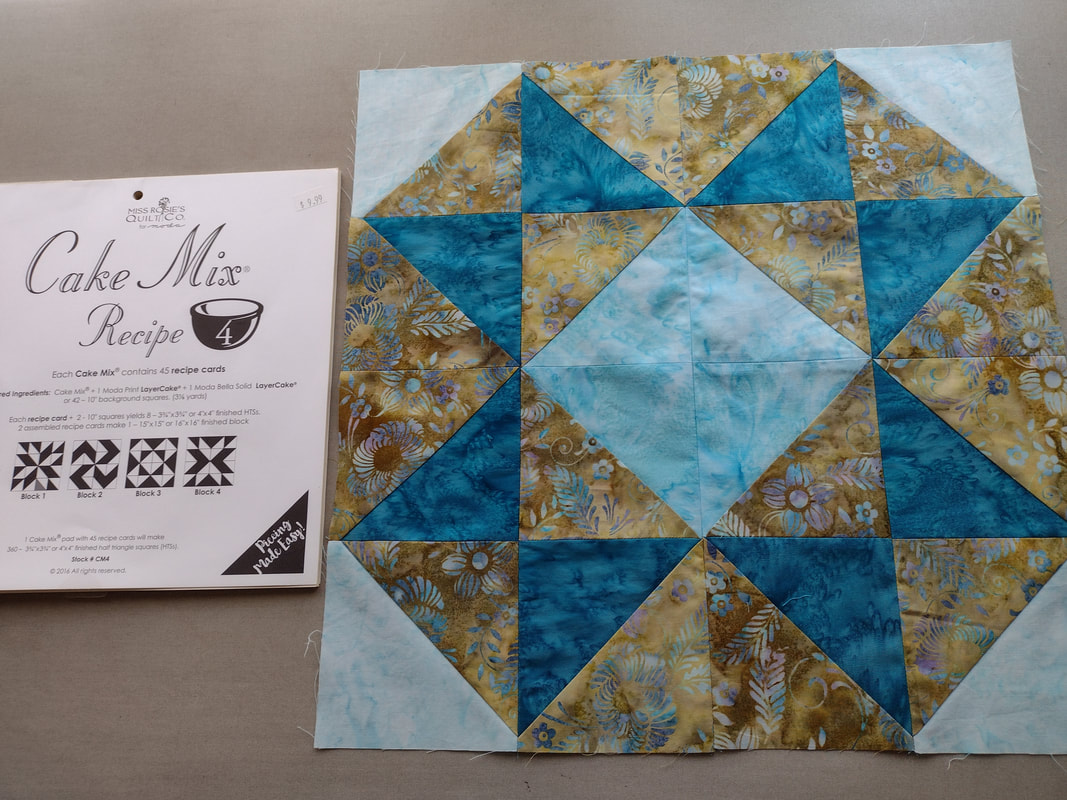 There are 20 star blocks in this quilt. Something new that I tried on this project is quilting with Glide thread at the suggestion of Sarah at The Little Foot Quilt Shoppe. She carries it there, so I picked up a spool. I loved the results! The little bit of sheen it gives is so pretty. I've purchased a few more colors since then. In the bobbin I've used my OmniThread in a color that matches as close as I can get. They work very well together. The edge-to-edge quilt design is called Fresco. 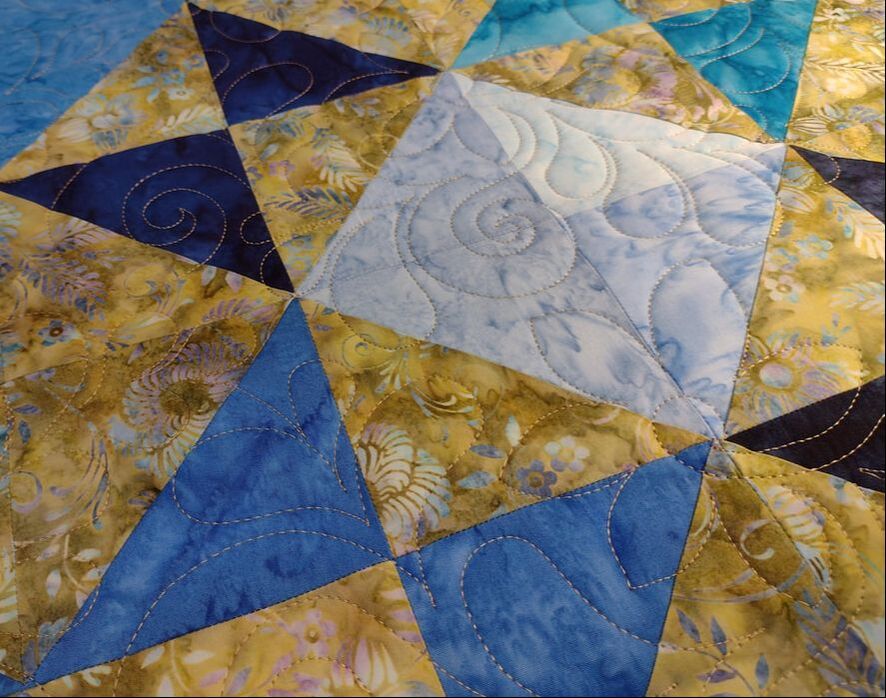 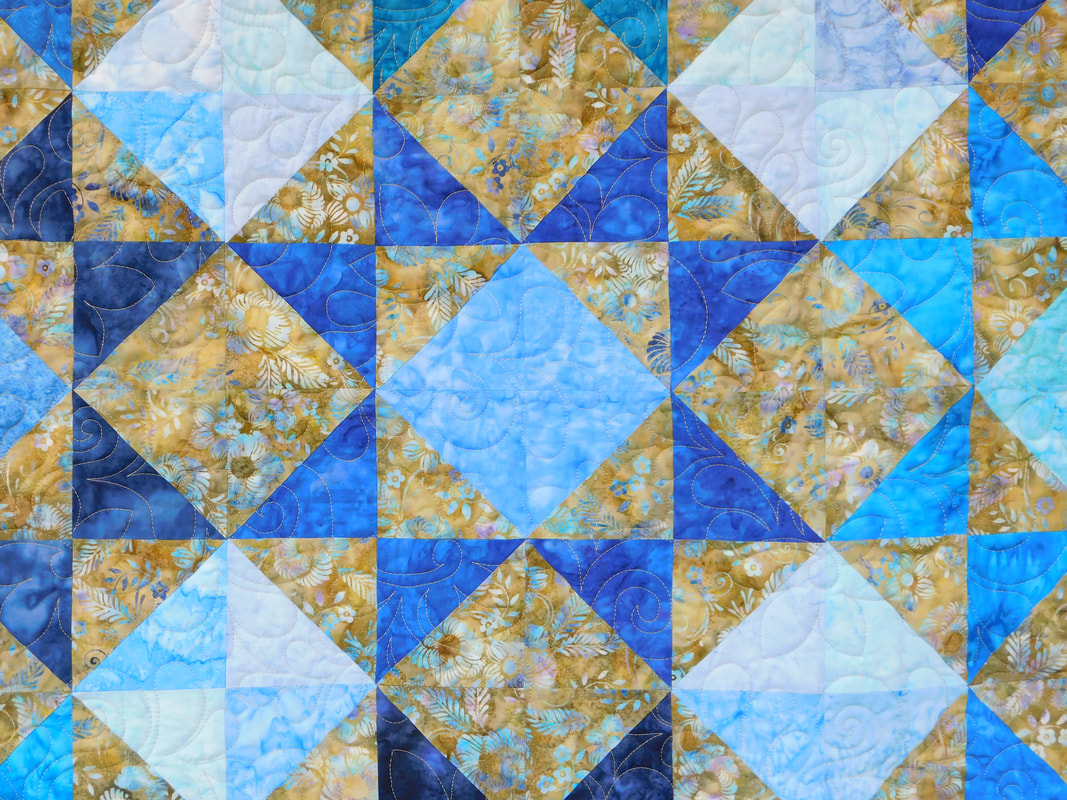 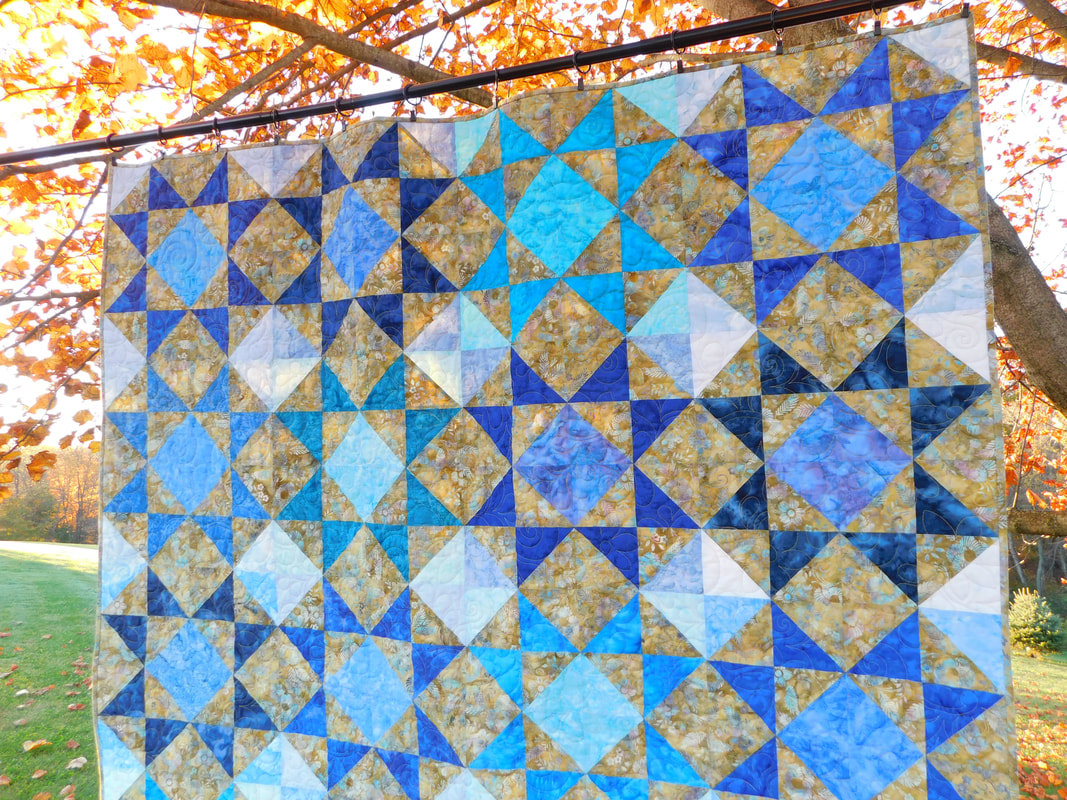 While I have no use for another quilt, I think I'll have to hold on to this one for a while, maybe forever. It reminds me of the batik room where I found so many beautiful fabrics that inspired me and how much I learned from Karen at The Quilt Company over the years.
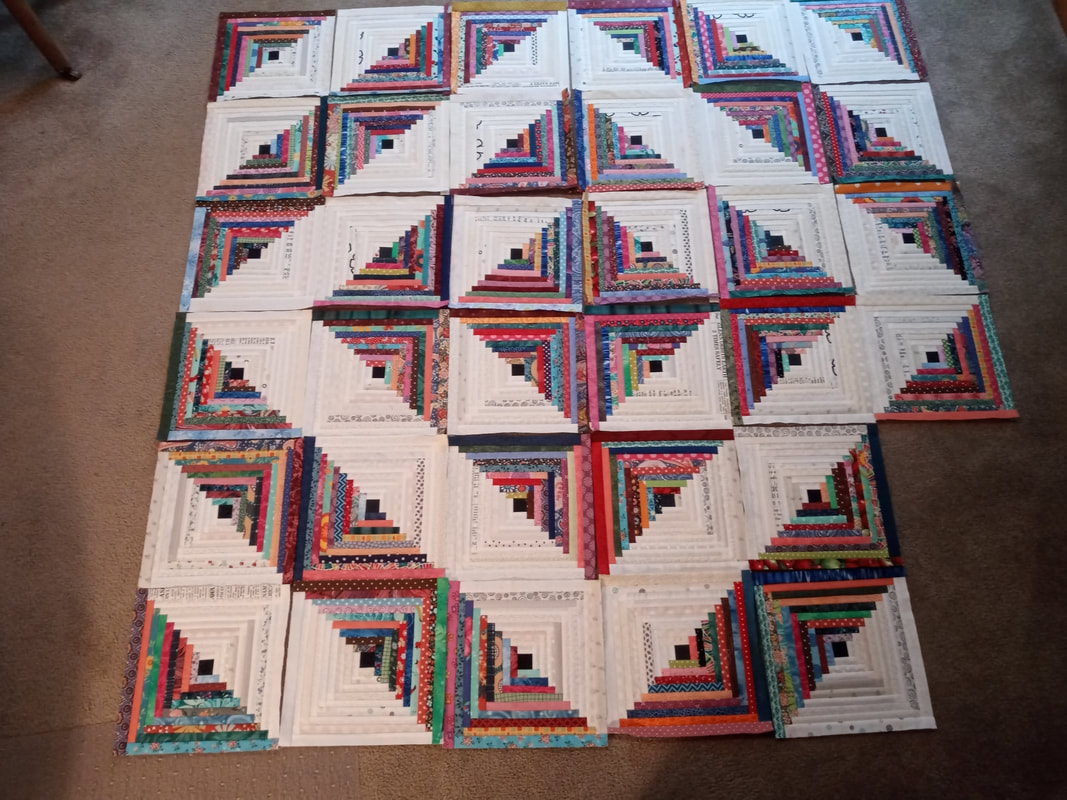
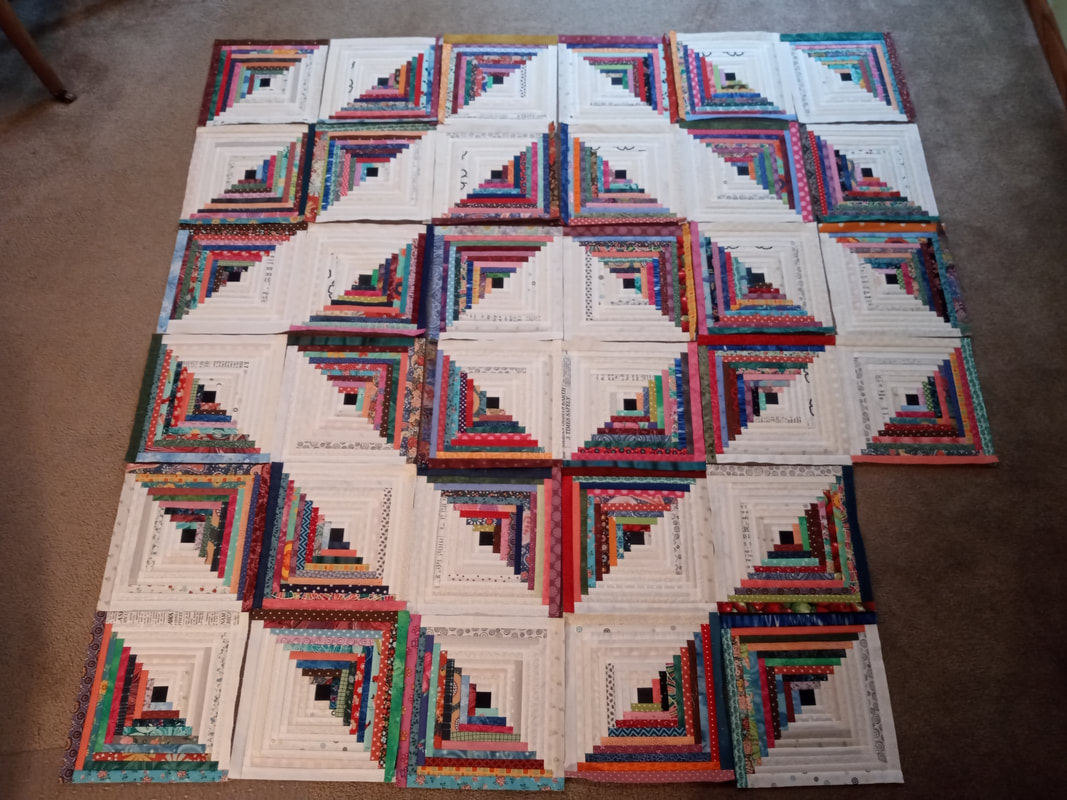
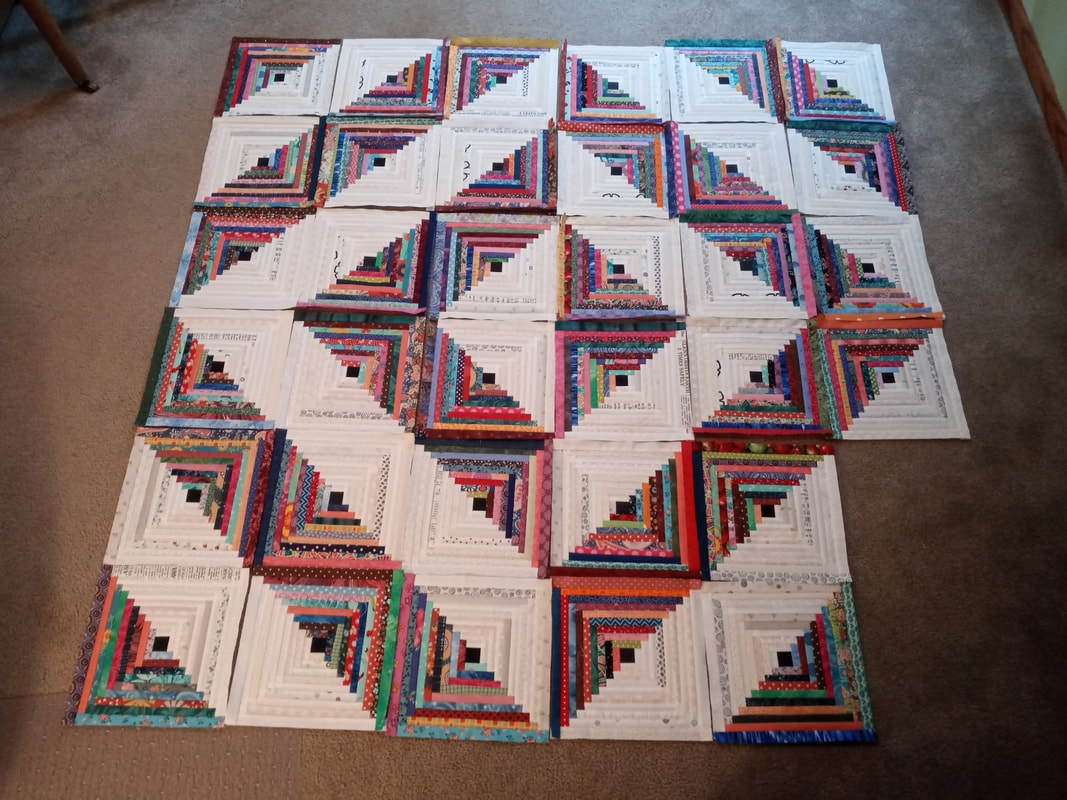
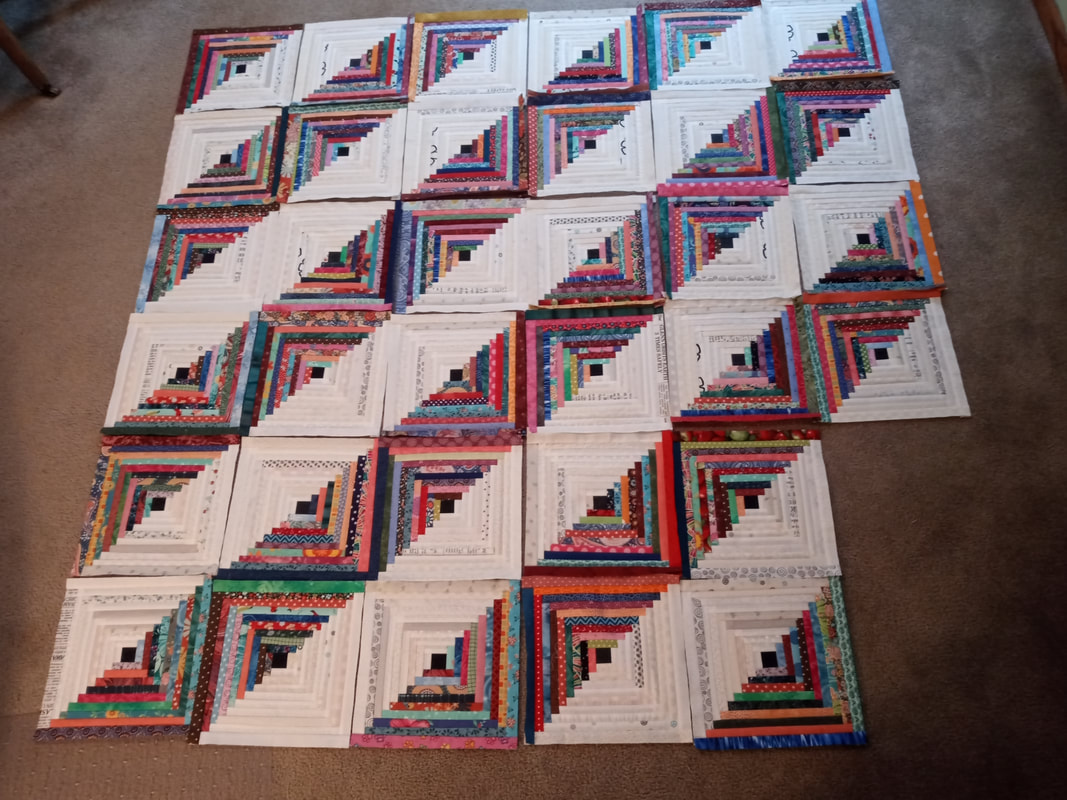
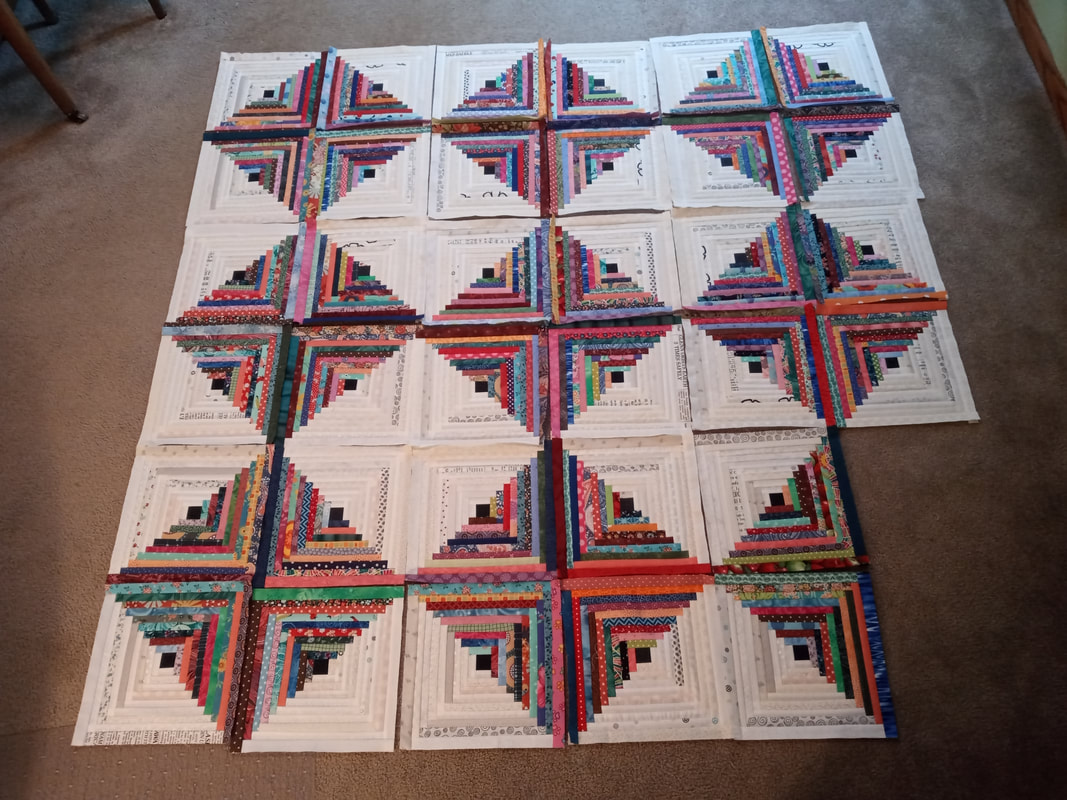
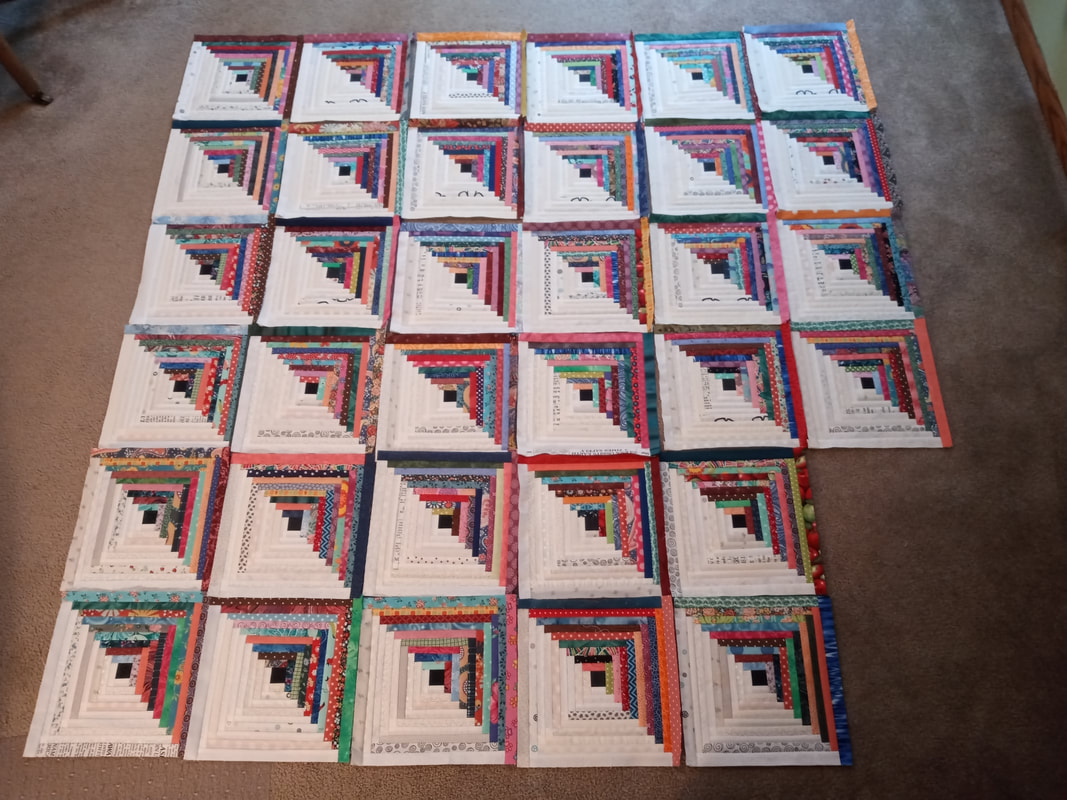
Chi Chi's restaurant is another place that is gone and never coming back. Does anyone else still mourn that loss? My husband agrees. I'll never eat another Cancun (seafood enchilada) from there again which makes me a little sad. I'm sure there are other delicious recipes being prepared out in the world, but it just holds some memories of good meals shared with special people. Thank you for reading! Now that I remember how to blog, I'm going to be doing it more often. Please come back soon for more quilty inspiration! 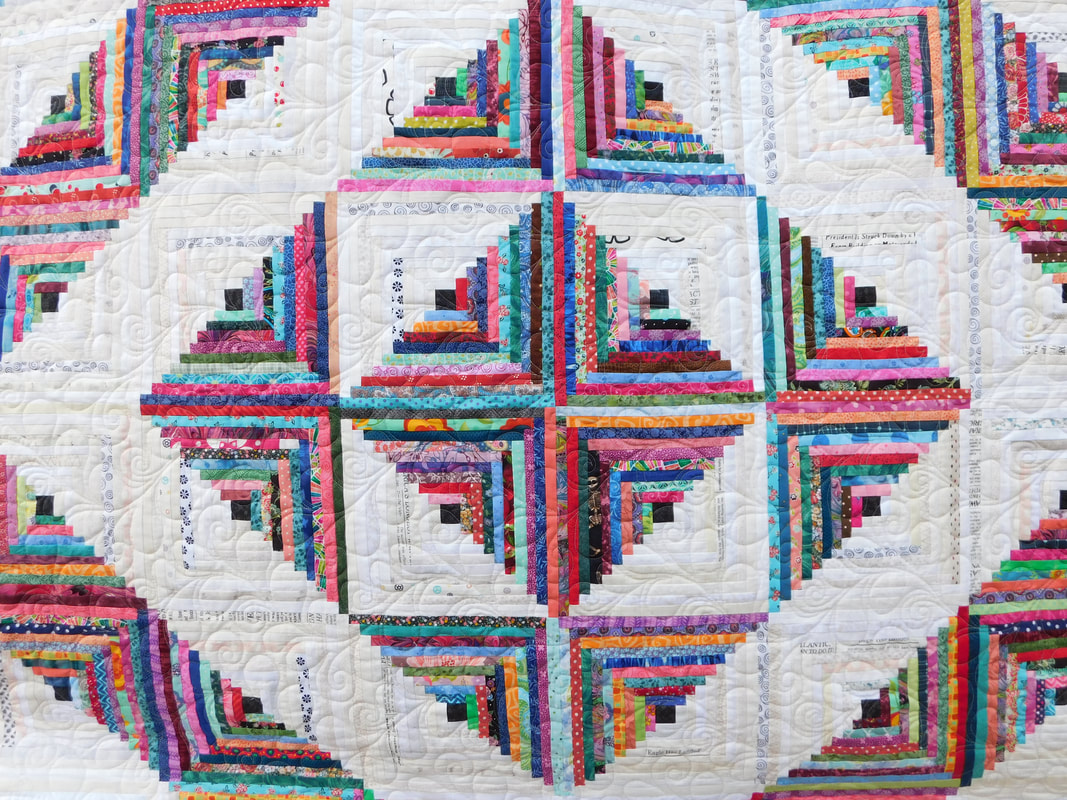 I was making Skinny Log Cabin quilt blocks with the Creative Grids USA 10" Log Cabin Trim Tool Duo that my mom gave me for Christmas. These blocks were so much fun to make and addictive! This Creative Grids USA ruler has options to make both "standard" and "skinny" log cabin blocks. I chose "skinny" so that I could use up my narrow "string" strips of fabric that I am continually accumulating. This quilt is made entirely from my scraps! 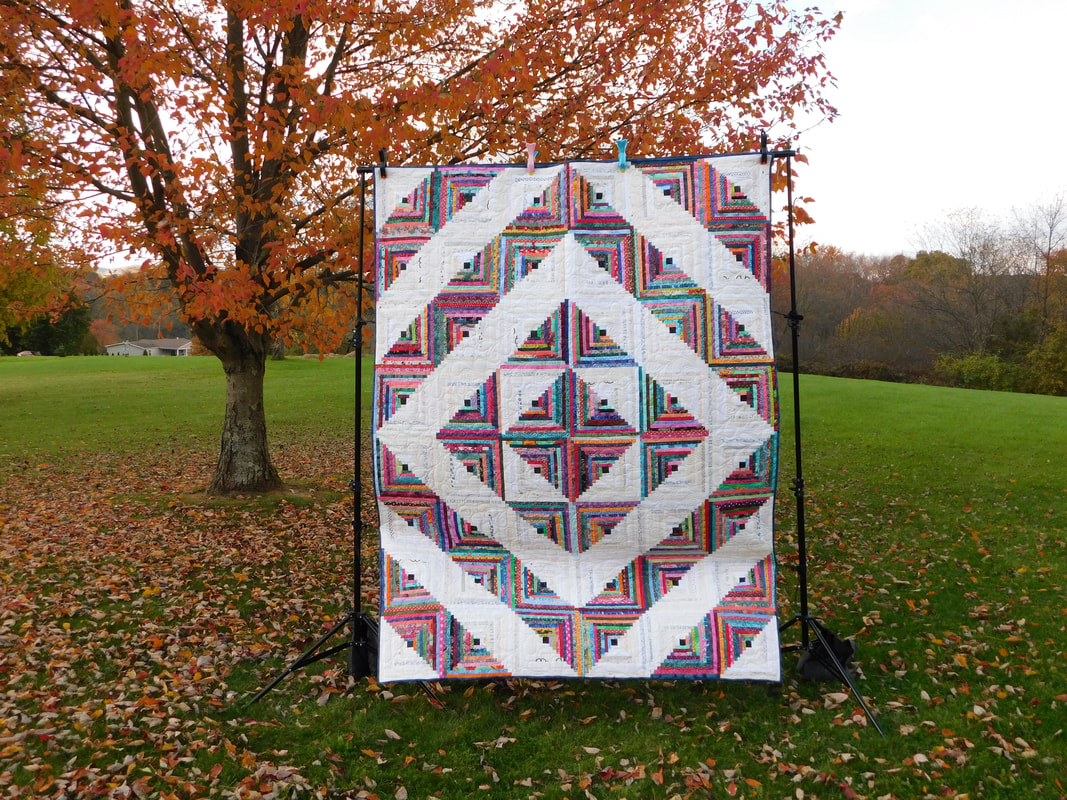 I first made a couple of test blocks before committing to a whole quilt. Once I had a system going, it was easy, mindless sewing. I would chain piece 6-8 blocks at a time, then trim them all down. I had my big bag of scraps and then sorted whitish strips and colored strips in two separate bins (actually plastic drawers) to swap back and forth when sewing. A rotating mat is very helpful. 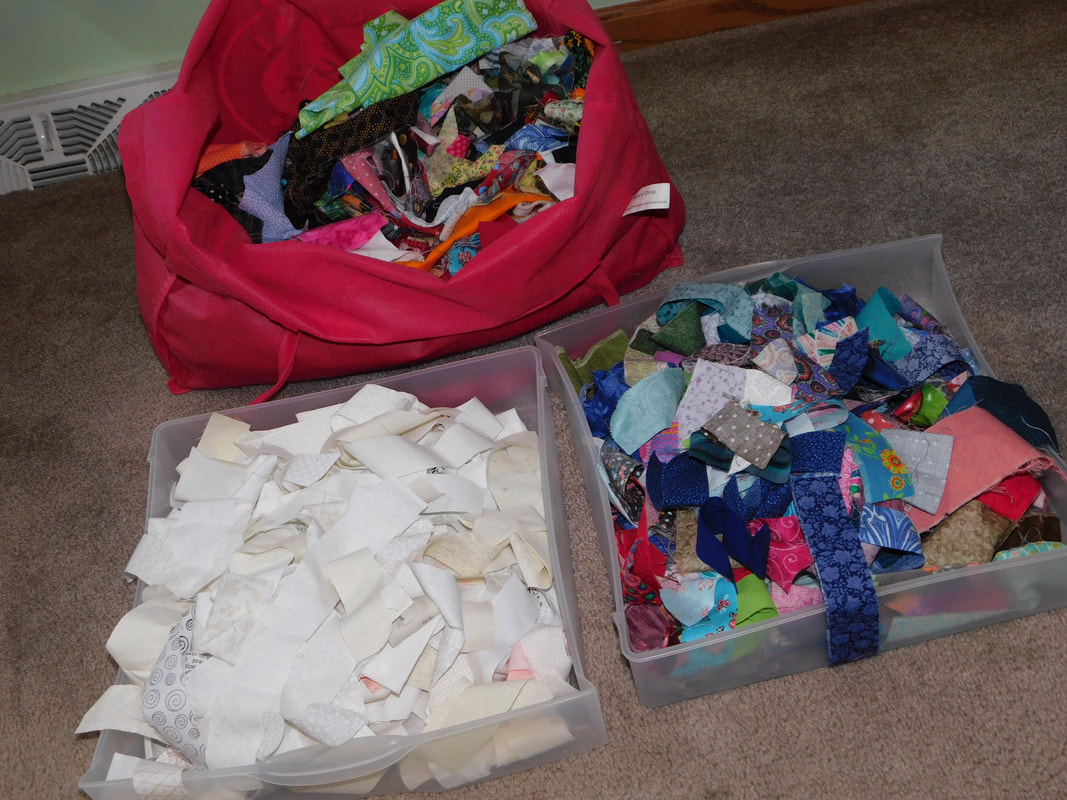 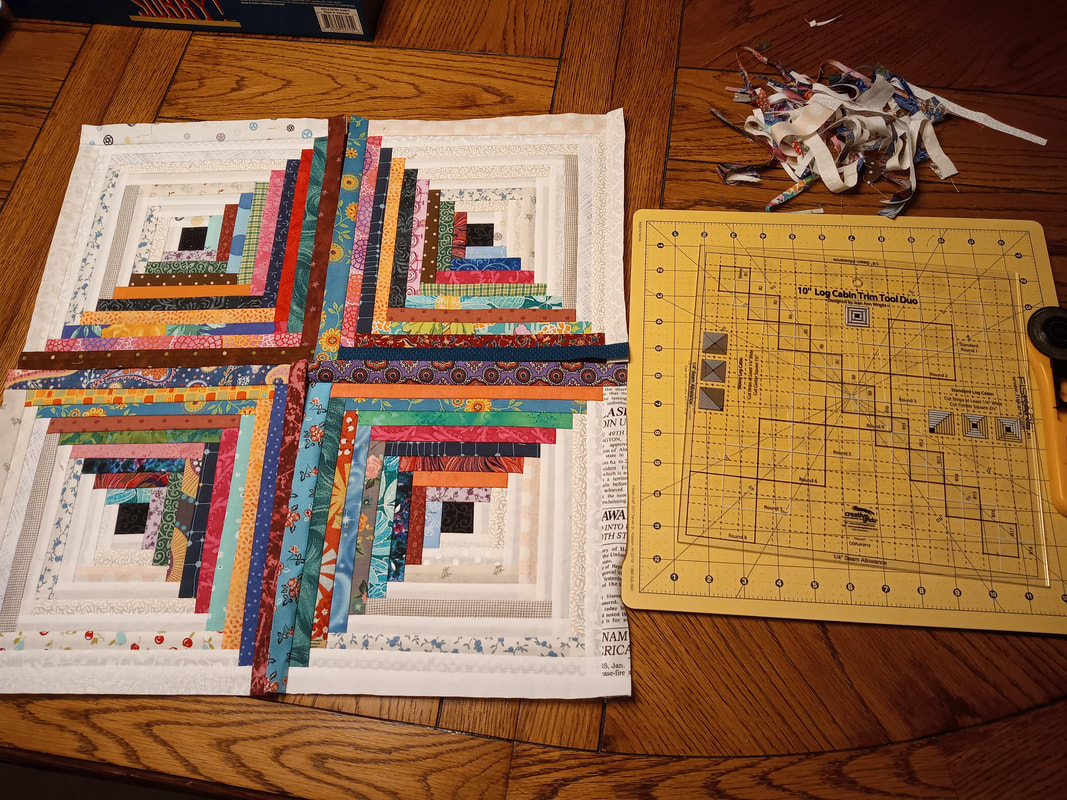 There are seemingly endless possibilities with this ruler. Once you decide how you want to make the blocks, then the fun begins deciding how to lay them out. Below are some layouts that I tried (before all of the blocks were made :-) They all look good, and I do believe I'll be making more log cabin quilts. I decided to quilt my quilt with the edge-to-edge design Chevron Feather. It's just a perfect combination of feathers and swirls and movement. 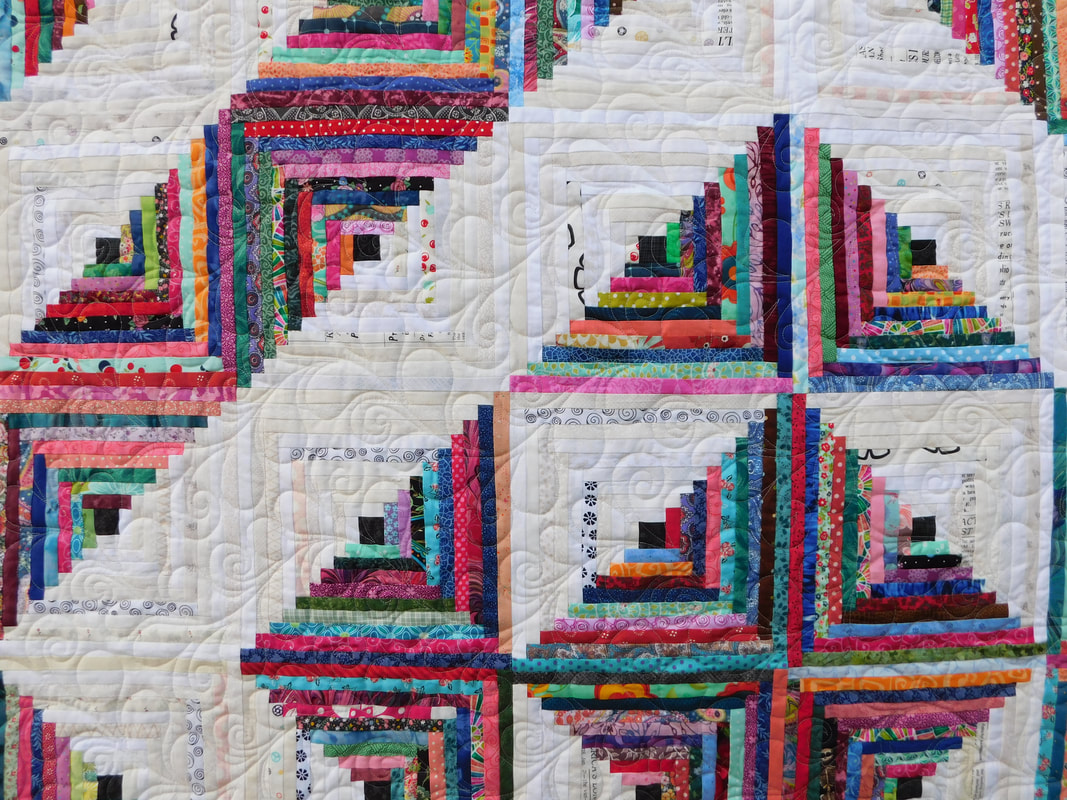 This quilt won 2nd place in it's category in our local farm show this past summer. And finally, I'll answer the question everyone asks about this quilt - Those strips are half an inch wide! One more pretty picture: 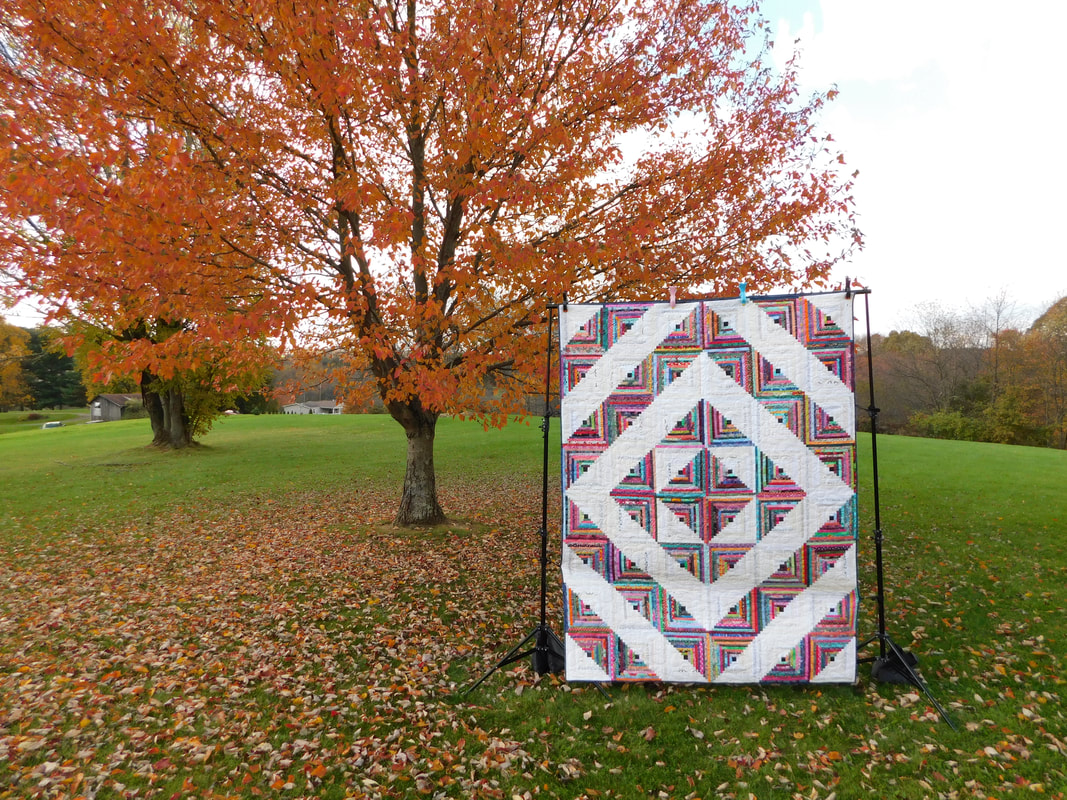 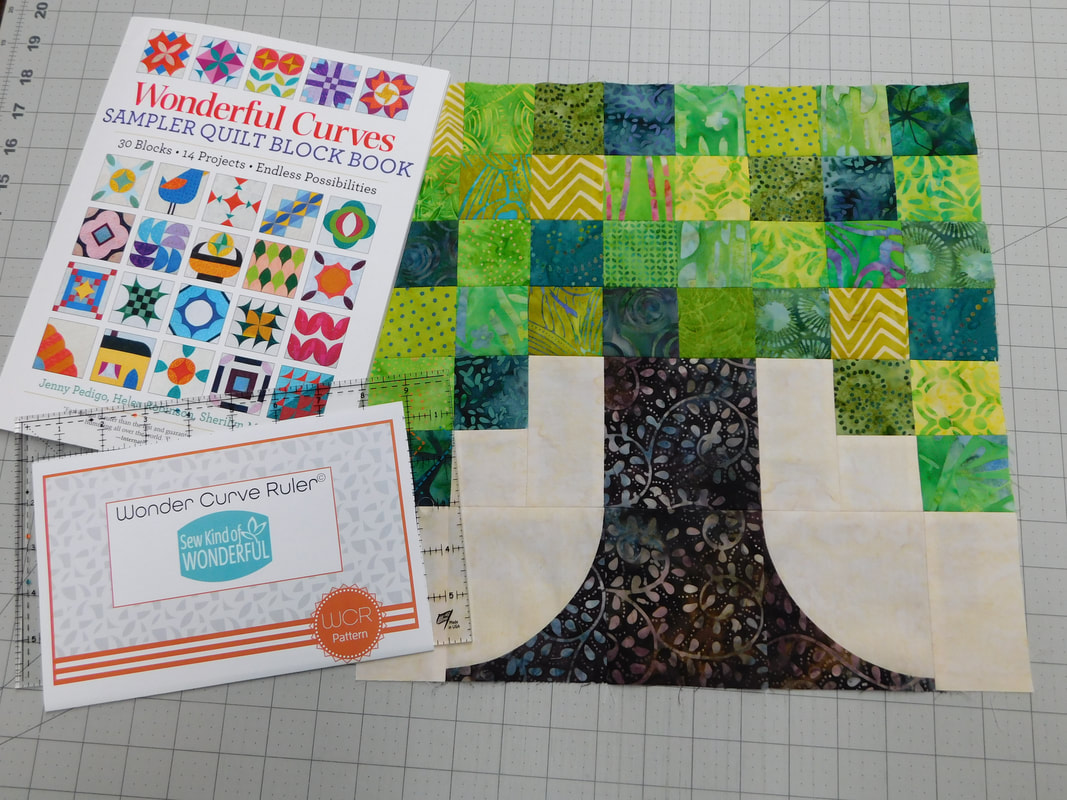 This Christmas Santa brought me a new book and ruler. I'm finishing up some other projects first, but I couldn't help trying just one block from the new book. I'm planning something really cool with my batik stash.
Thanks for following along with me in 2021. Looking forward to good things to come in the new year for both you and me! Thanks for visiting! 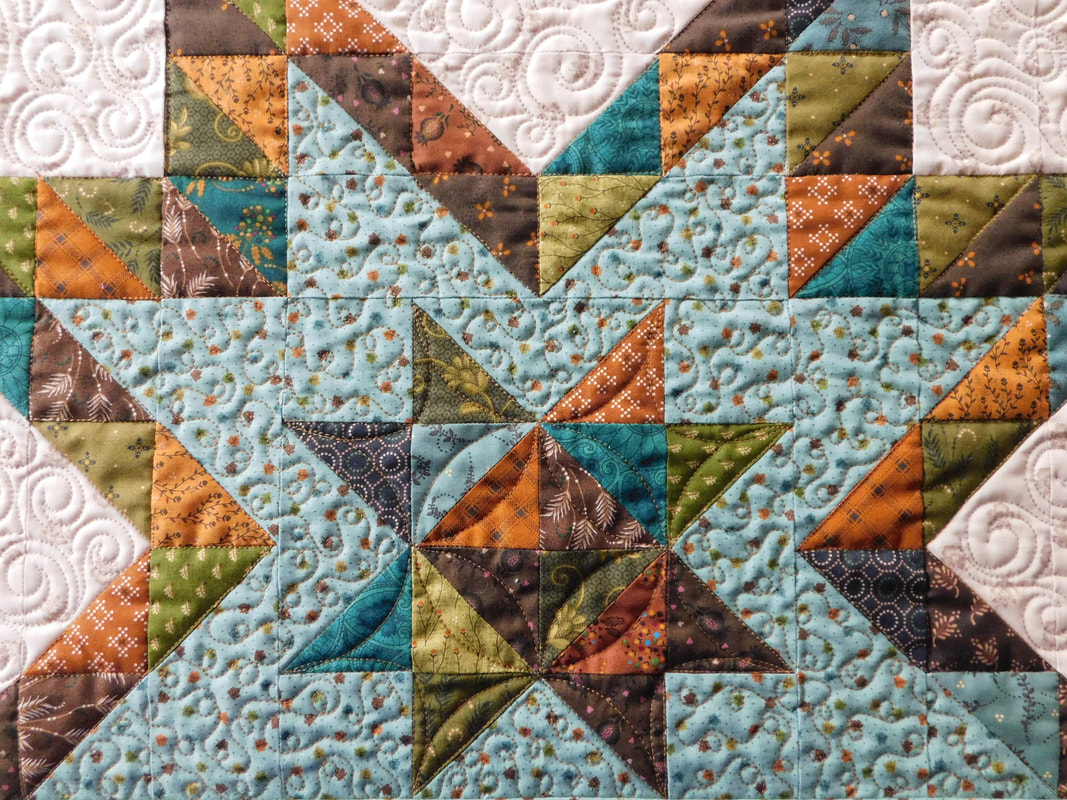 It's Thanksgiving night. I hope you have all enjoyed the day with family, friends, and a delicious meal; the dishes are done, and you are putting your feet up. This year I completed a couple of small quilts that I consider to be "Thanksgiving" quilts to decorate our home with. The first is this table runner. The pattern is Twinkly Stars in the book Trendy Table 3 from Anka's Treasures. I couldn't resist this wonderful star design. It's made with charm squares from the fabric line October Morning by Kim Diehl. 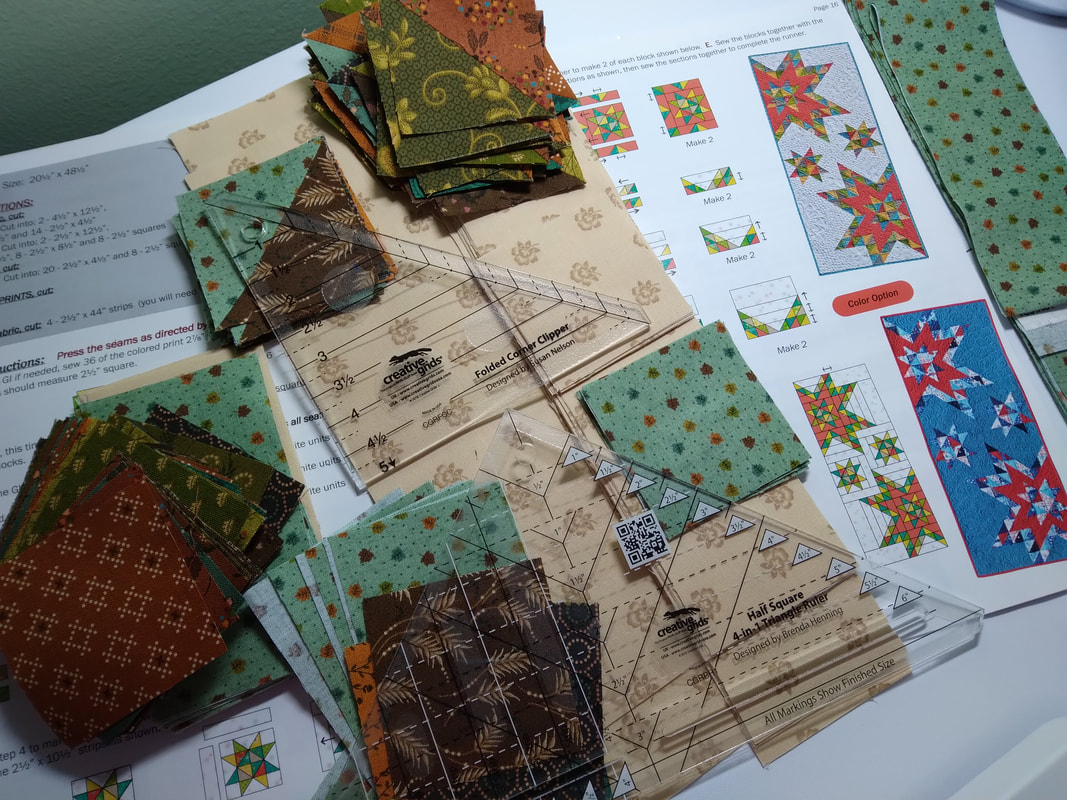 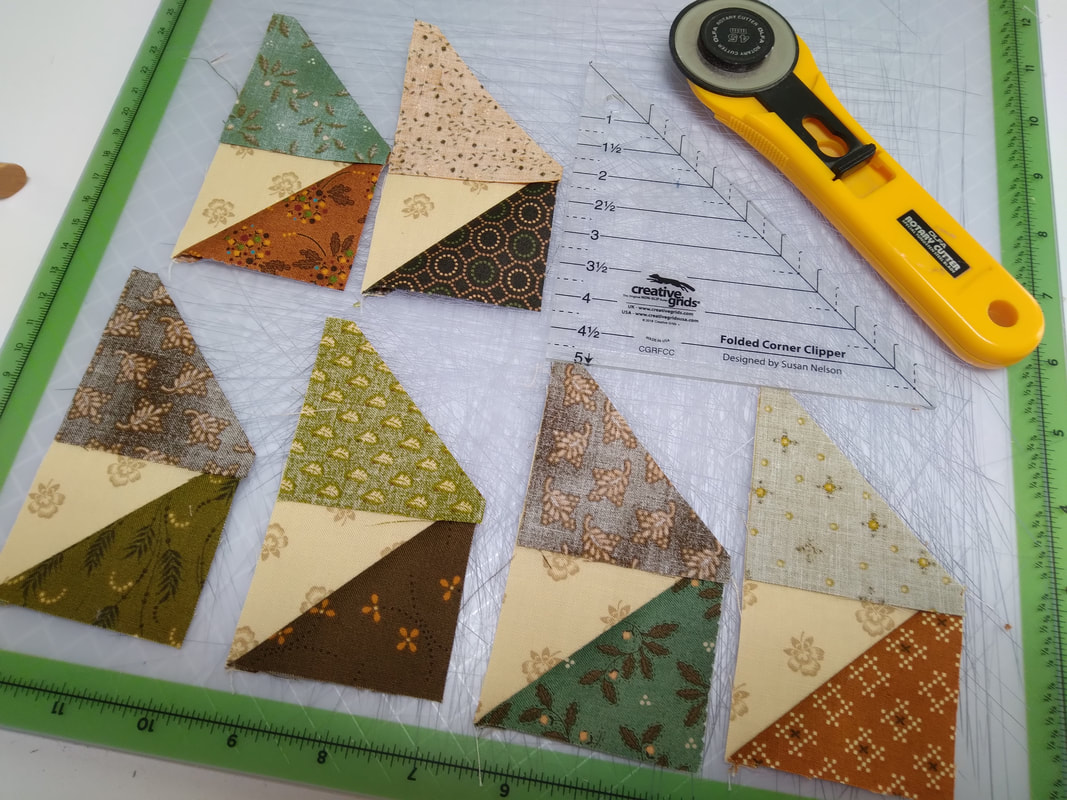 Of course, I had my Creative Grids tools to help me: The Folded Corner Clipper and the Half Square 4-in-1 Triangle Ruler. 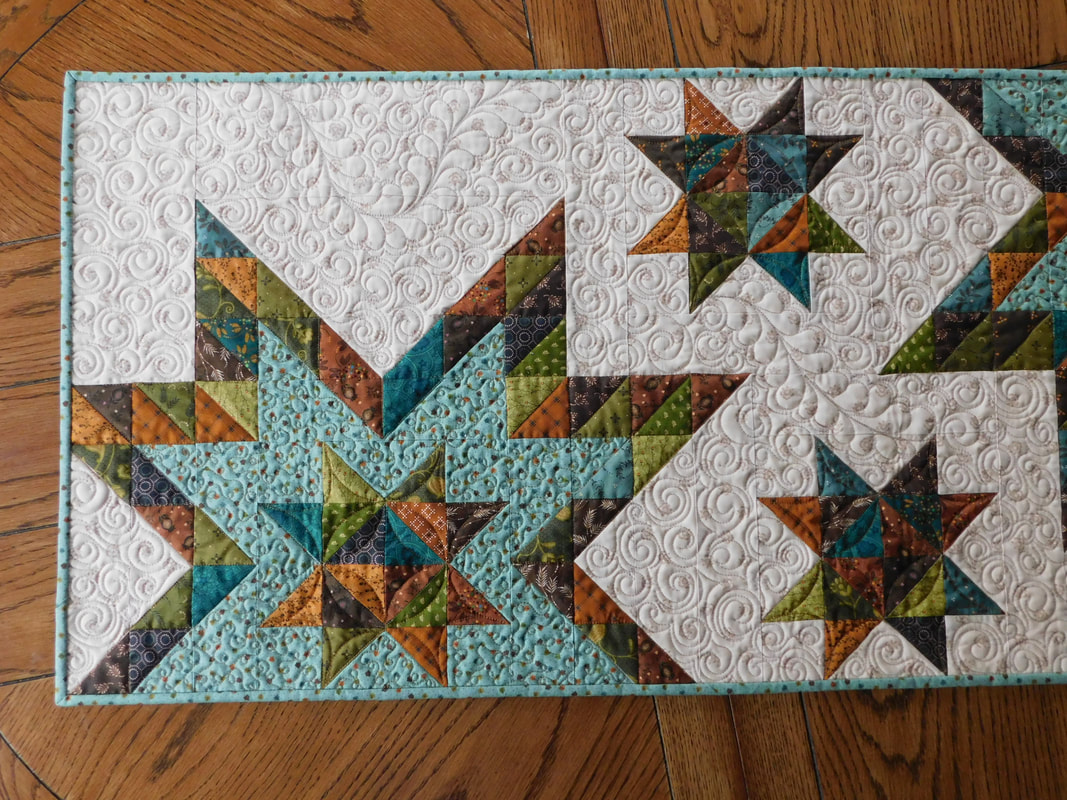  I custom quilted this project, and I really love how it looks on my table! The next project is a wall hanging. The fabrics are various prints from JoAnn's, and the pattern is called Raspberry Stars from Cut Loose Press. The Creative Grids USA Cat's Cradle Tool is the key player in piecing this one. 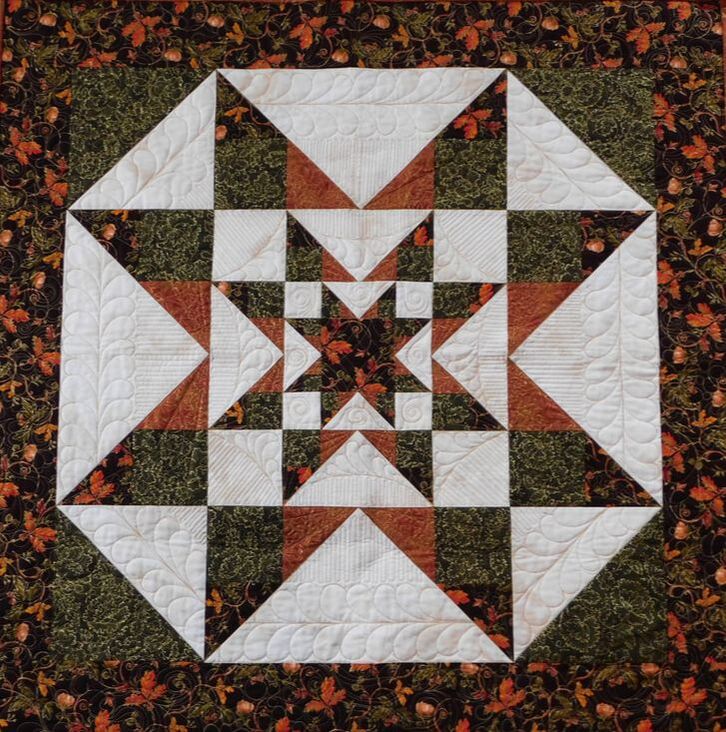 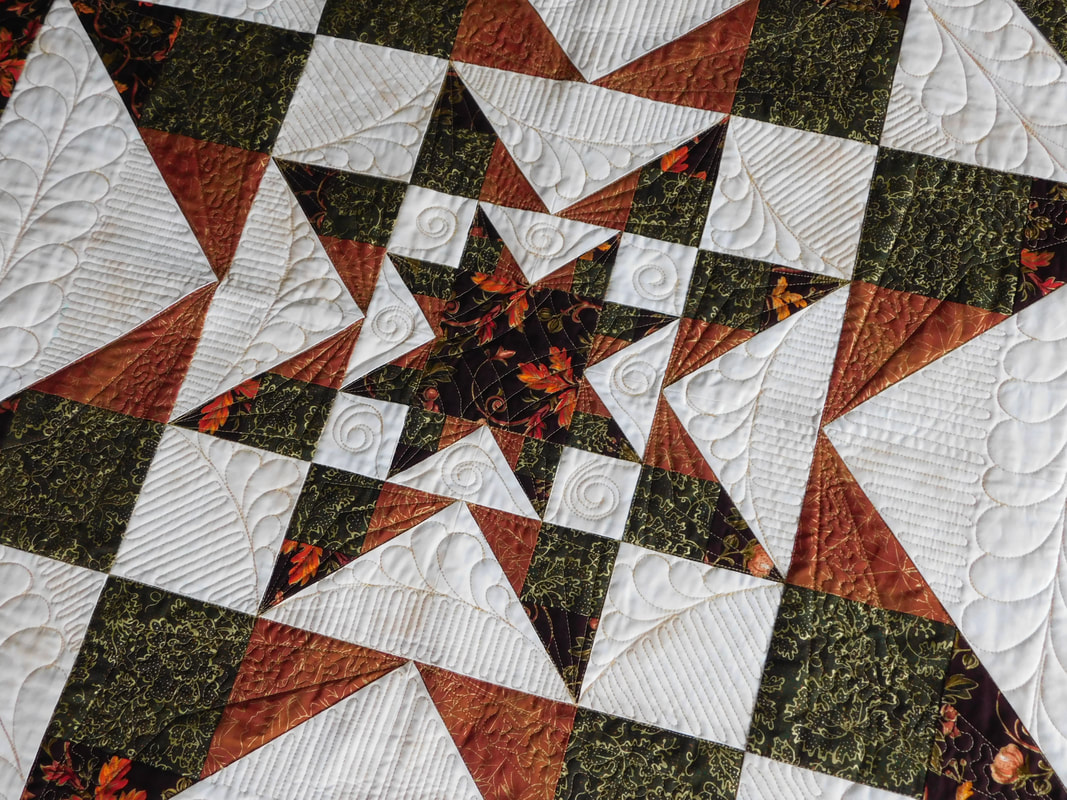 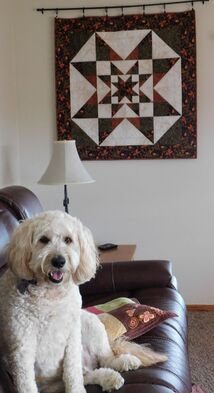 I'm pleased with the final result of the custom quilting on this quilt as well. I actually pieced this in 2018 but just quilted it about a month ago. It is hanging in our living room, but only for a short time until the Christmas decorations come out.
Jack Doodle has been stealing my seat on the couch these days. He is a good foot warmer, though. I suppose I should be thankful :-) Stop back again soon! 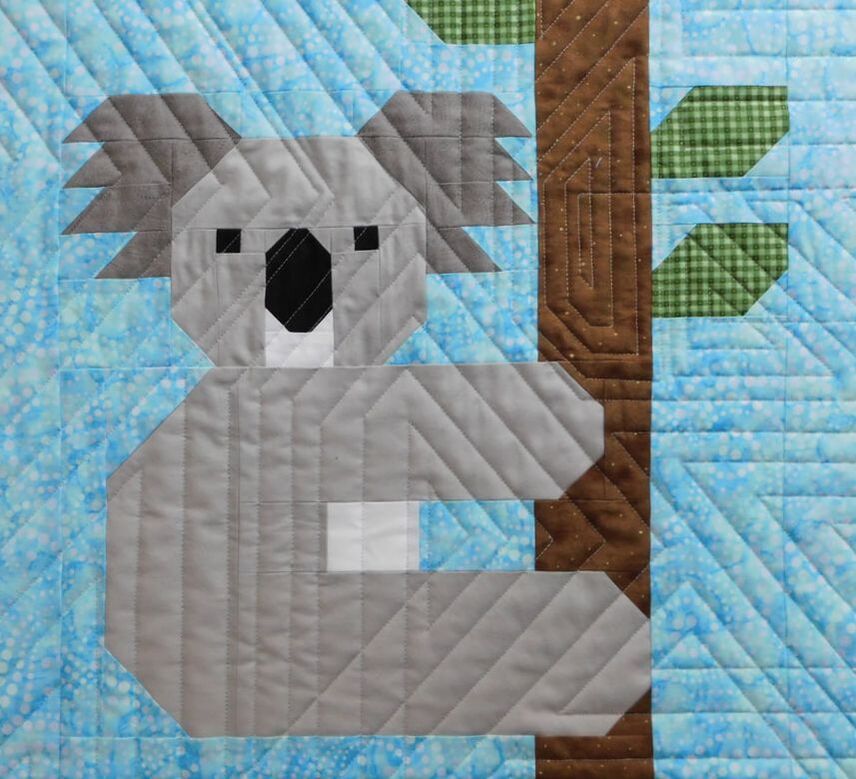 Today I'd like to share about this little cutie I made about a week ago. This is the pattern Koalas by Elizabeth Hartman. I'm a sucker for her patterns. They are adorable. I've made several, but all small versions. To me one koala is very fun, but a whole quilt of them might make me a little crazy. Following instructions closely is essential with her animal patterns with lots of different sized squares and rectangles.  This style of piecing mostly uses what I call the "snowballing" technique - drawing a line corner to corner on the square, lining it up in place, sewing on the line, cutting off the excess, and pressing. The Folded Corner Clipper from Creative Grids USA is the most helpful tool for this job! Instead of drawing the line on the fabric, just line up the square where it needs to be, line up the Folded Corner Clipper, rotary cut, sew, press. I previously made Elizabeth's patterns the usual way drawing the line, but instead I used this tool for the koala. I am so happy to say that I achieved much, MUCH better precision piecing. Some of the squares were 1", and it worked great! 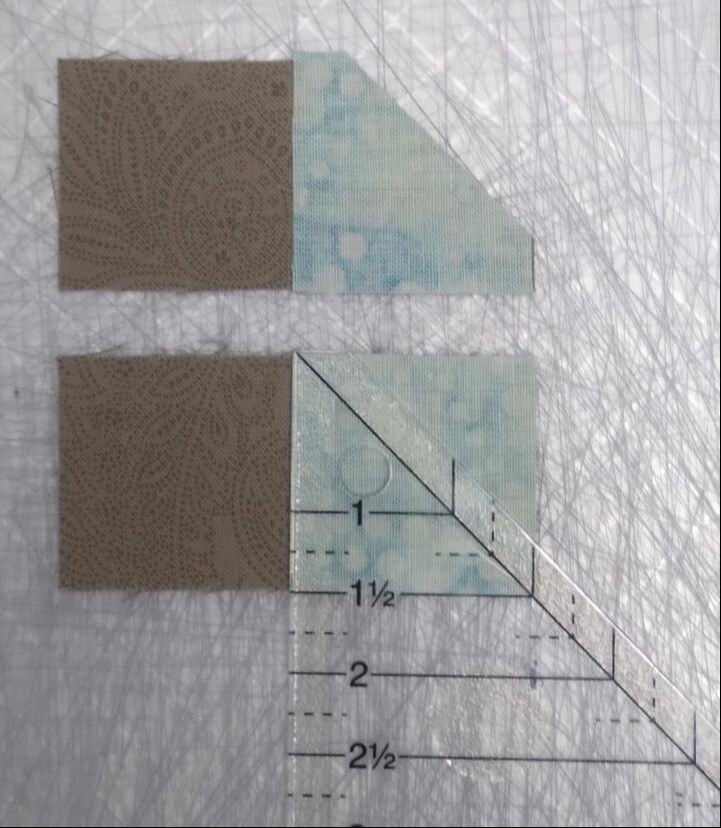 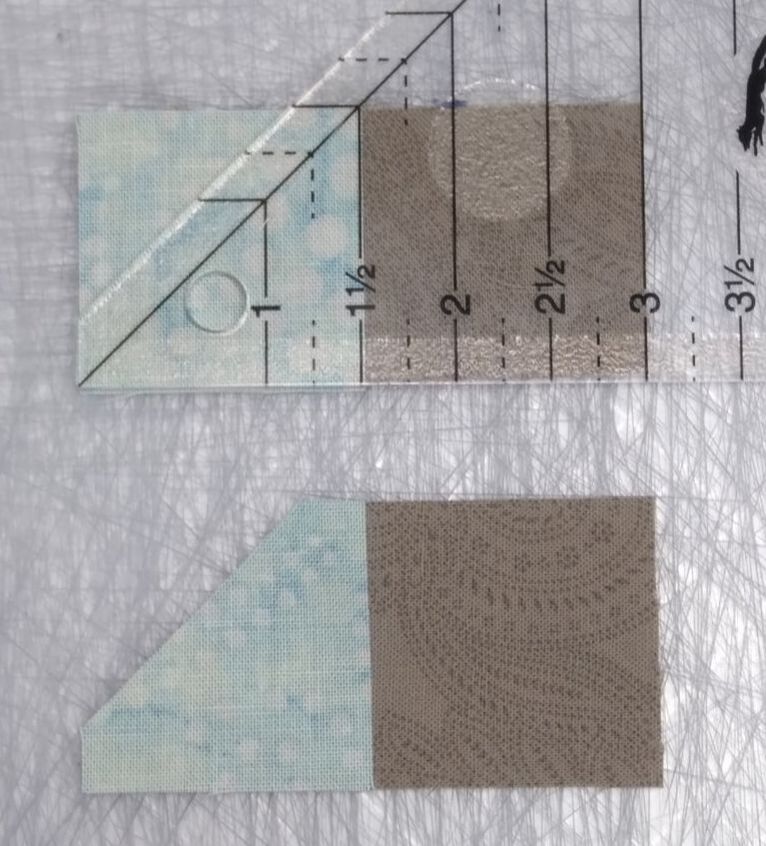 Without a doubt, I have better results sewing using the 1/4" foot on my machine as a guide along the cut edge than I do stitching on a line. Some lines are wider than others, some lines can be crooked or wiggly which can leave you guessing!  My mom gave me an unusual piece of fabric a few weeks ago that she thought was colorful and just my style. She was right! And I loved the idea of using it on the back of the koala. This project was made using all fabrics from my stash! I quilted it with straight lines, random directions, random widths apart, not planned at all, simple, different. It's cool. 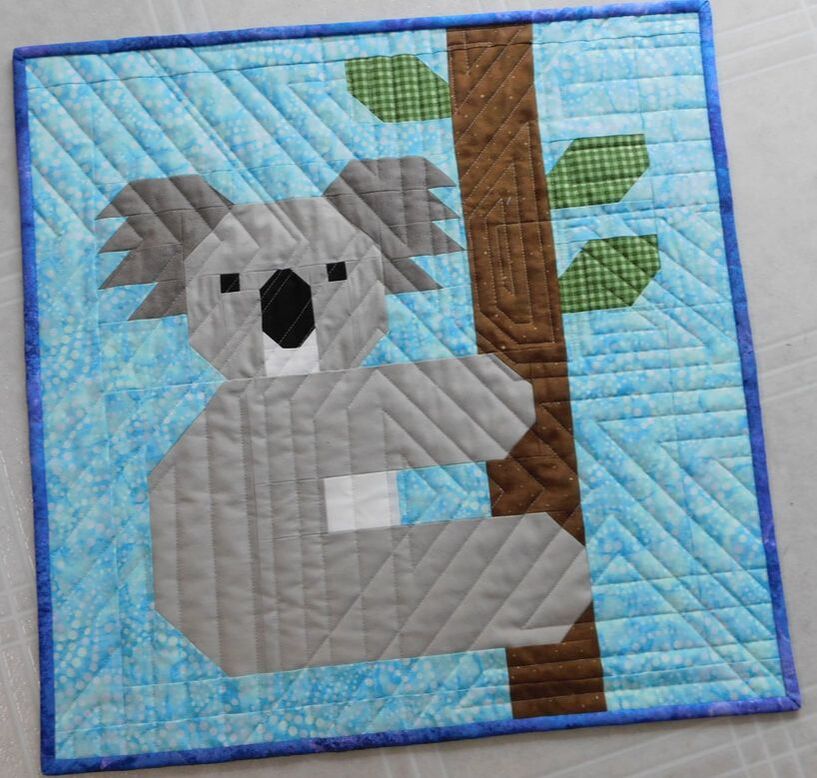 I encourage you to try the Folded Corner Clipper Tool. I use it to make all of the bias cuts for joining together binding strips for my quilts also. 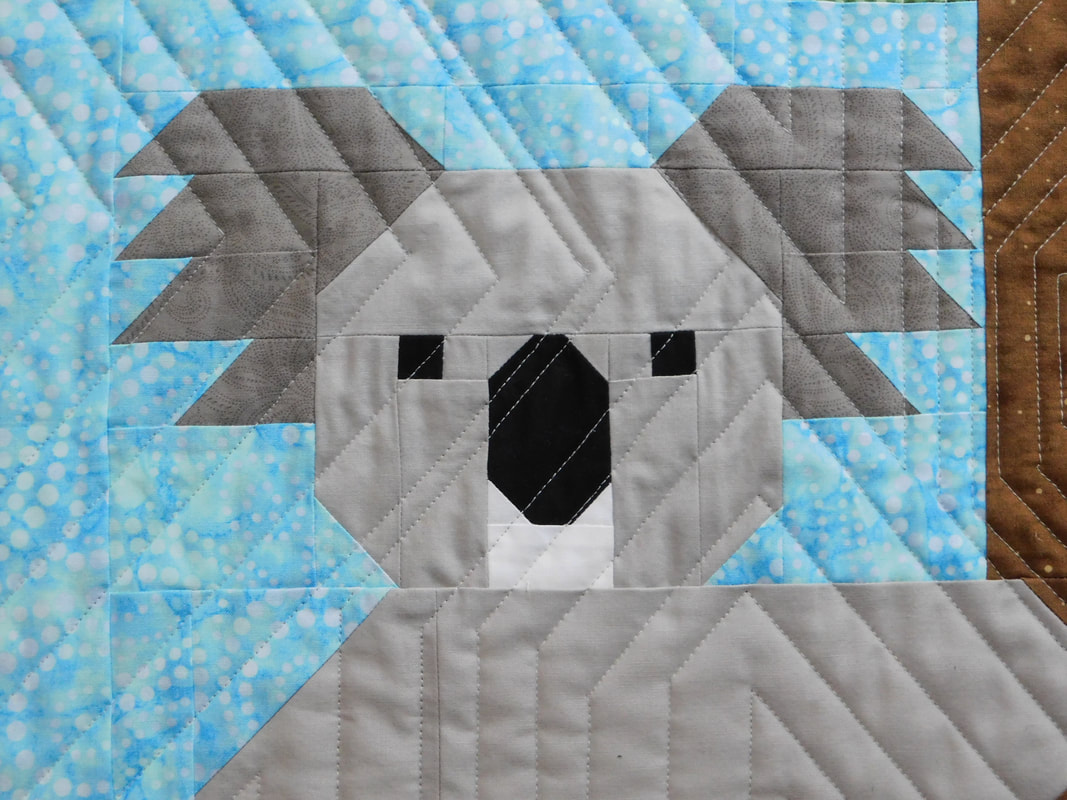 My daughter Niobe is off to college now, and her walls are bare. I gave this little quilt to her to brighten up her dorm room. Of course, she loved it!
Thanks for visiting!  The story of this quilt began back in 2017. A year or two earlier I entered a contest on Facebook to win the Creative Grids USA Scrap Crazy 8 template set, and my name was chosen! The funny thing is Creative Grids didn't even have to mail the set to me, I just drove down and picked up my prize from Karen Montgomery (designer of the templates) at her shop The Quilt Company. I already made a couple of quilts with the templates and absolutely love using them with layer cake squares, but I also wanted to try making a quilt with my abundant scraps. These muted, dark colors are not my favorite, but I had a lot of them from various projects over the years. I thought I'd see what I could do with them. 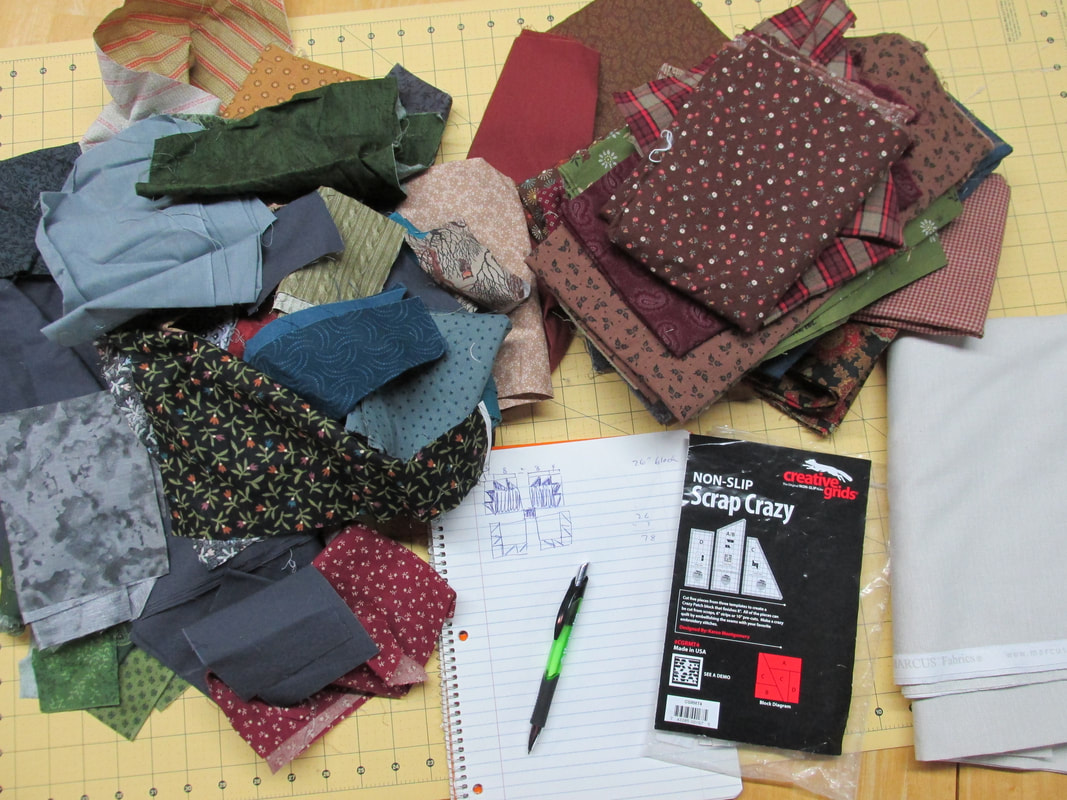 I pulled some scraps I wanted to use and started drawing out an idea to make my version of the traditional bear paw quilt block. I purchased the background fabric, but all of the other colored fabrics were ones that I already had stashed away. Some of them I cut to 10" blocks and then cut the individual pieces. Others I would cut a strip the correct width for the different size pieces and cut as many as I could get. There are 5 pieces that make up this Scrap Crazy block. 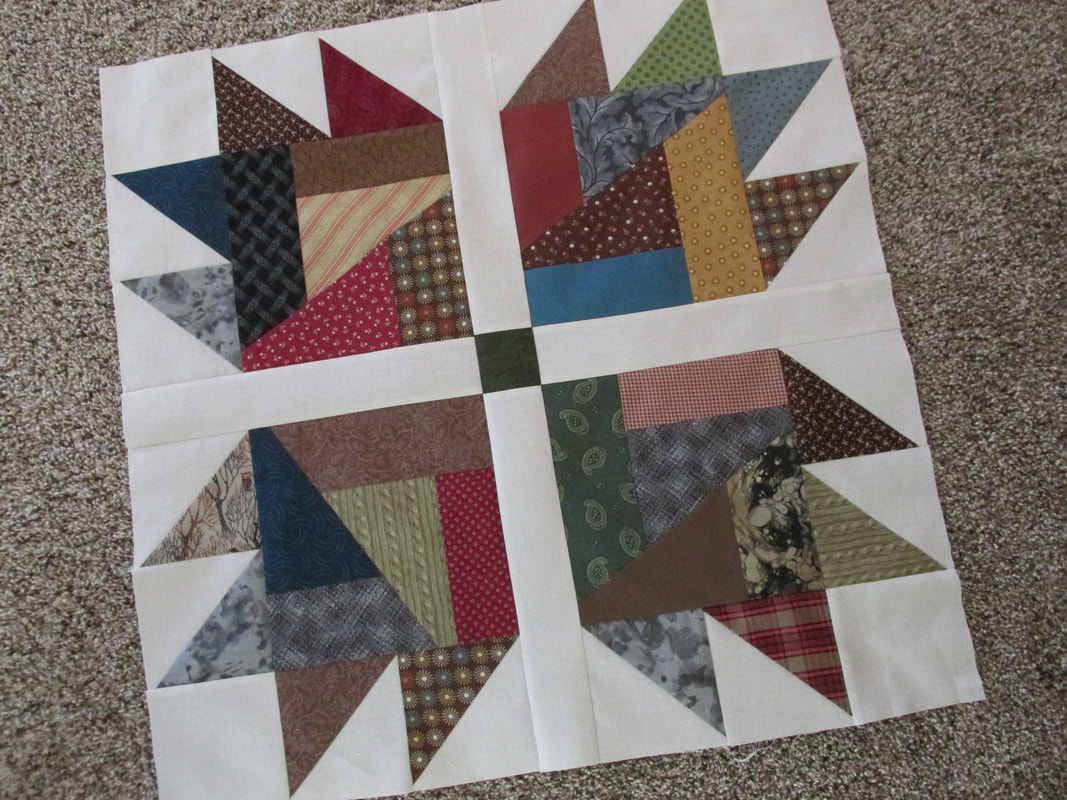 This is the block that I came up with. I also wanted to make something different for a border using the templates, and the picture below is the block that is repeated in the top and bottom borders. 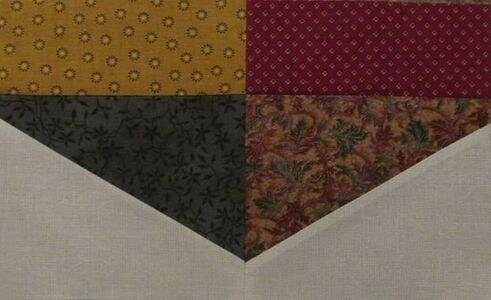 I posted the progress of this quilt on social media, and it caught the eye of some folks who encouraged me to write this as a pattern for Cut Loose Press. I decided to go for it - what did I have to lose? It makes me sound way more important than I am when I say (and it's true) that this is my best selling pattern. I also went on to write a couple more patterns for CLP. 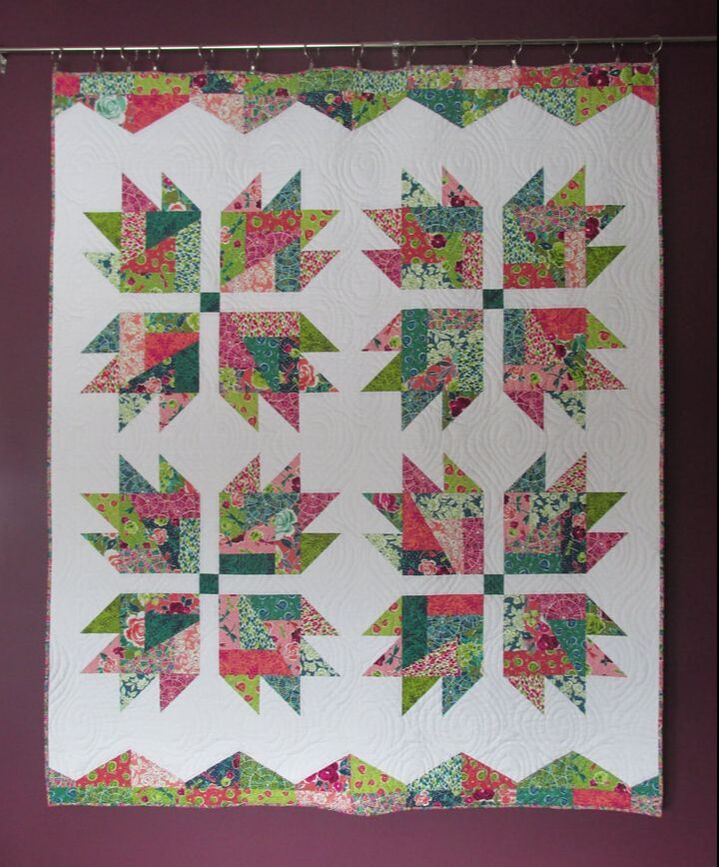 That's the Cut Loose Press Scrap Crazy Bear Paw pattern! I showed this quilt off last weekend at the St. John's UCC Quilt Show and taught some ladies how to make the Scrap Crazy block. It was such a fun experience! Here are a few more pictures of the Scrap Crazy Mama Bear Paw Quilt that started my journey in pattern writing. 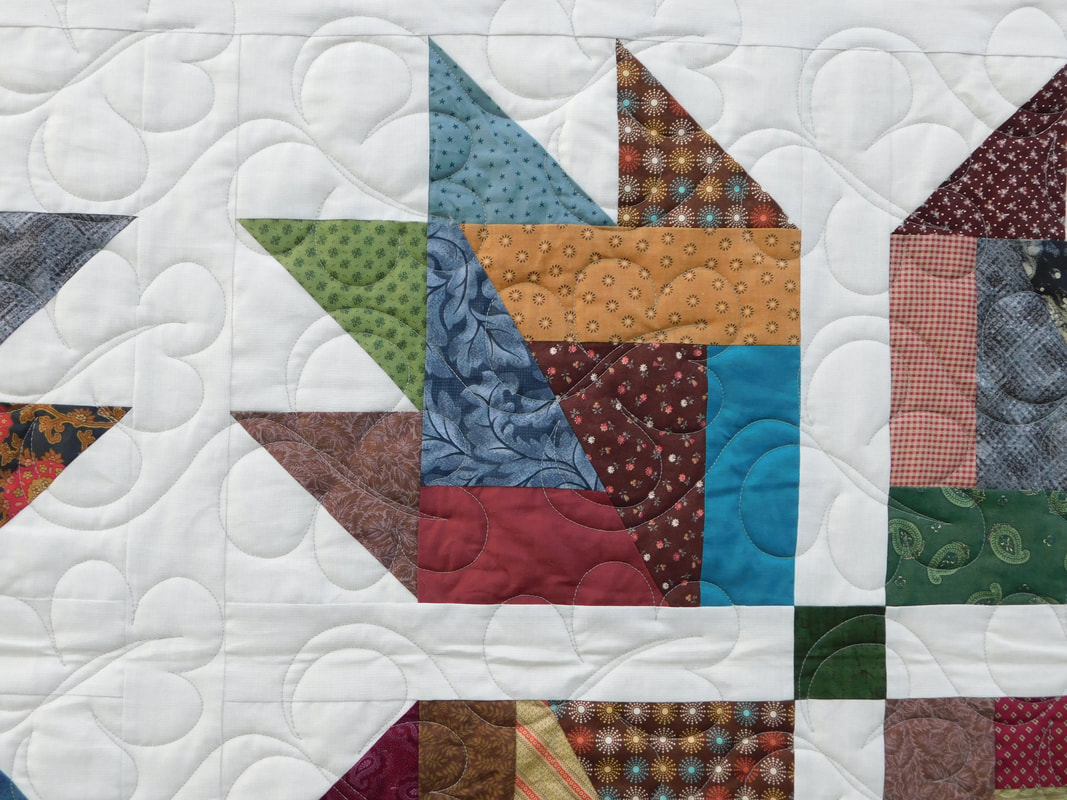 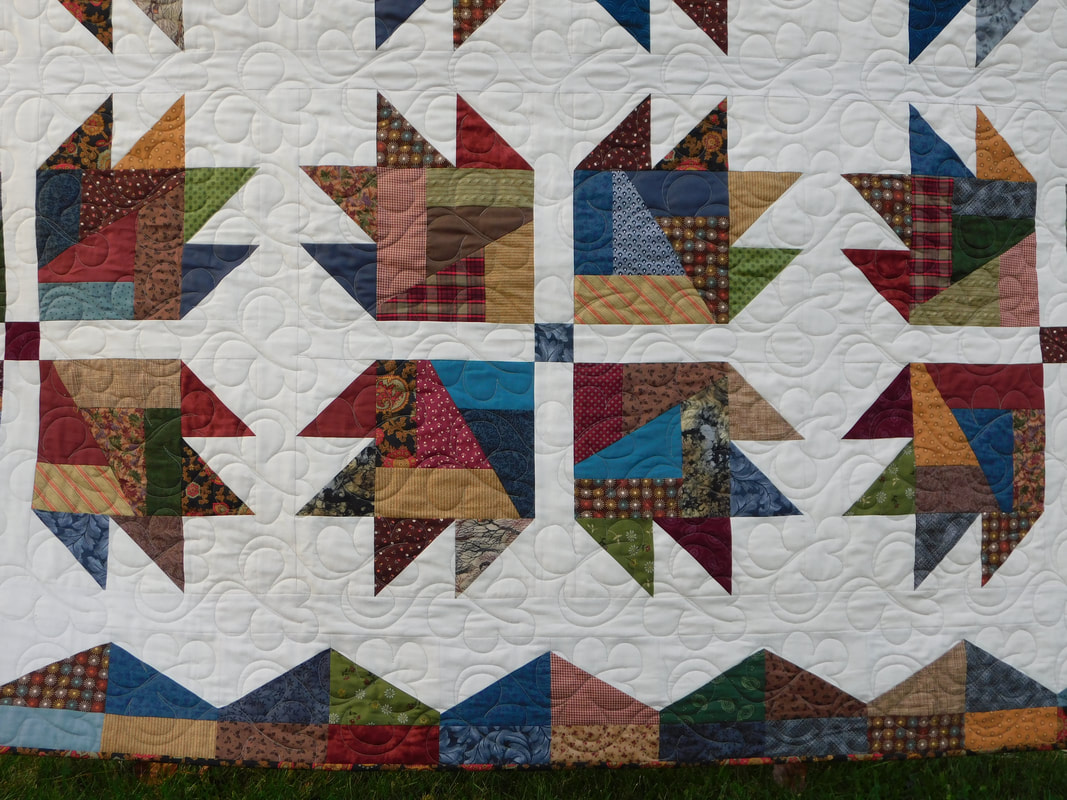 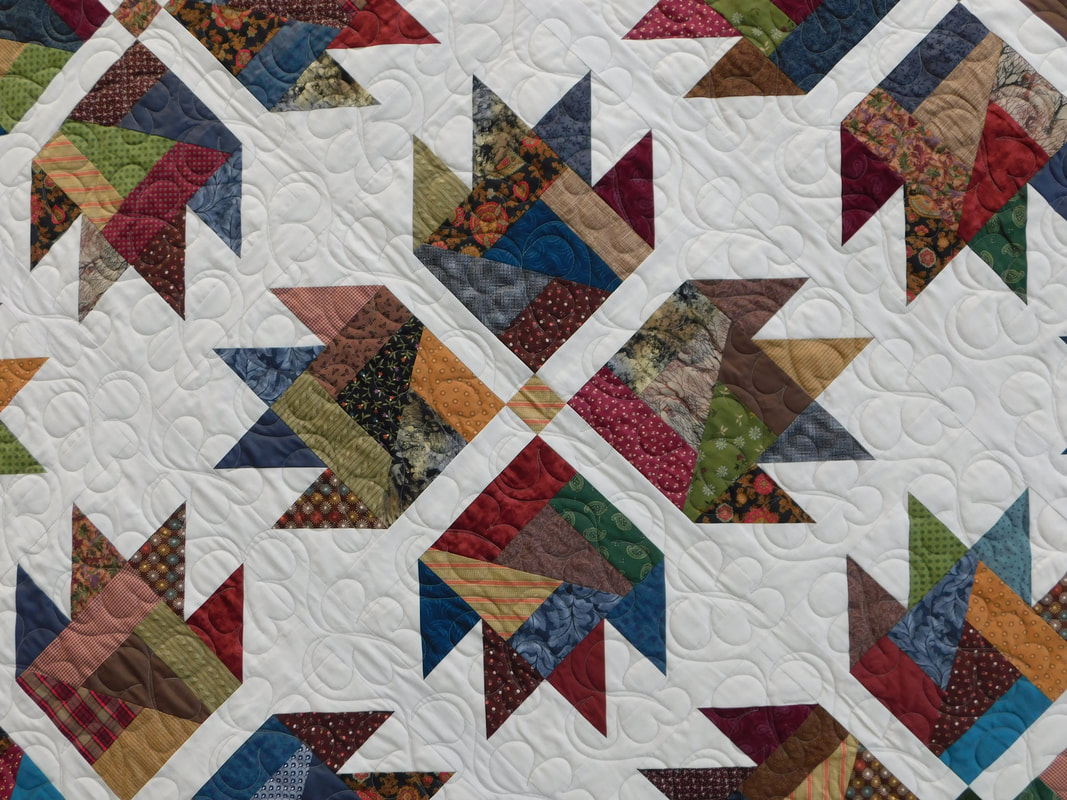 I quilted this myself with an edge-to-edge design. It is a large leaf design which is a good scale for a large block like this, and it is nature-y which seems to fit the theme, like a bear in the woods. Started in 2017 and finished in 2021.  You will be seeing more quilt patterns from me in the future (at least that's the idea:-). It's just taking longer than I planned!
I just love this picture in front of the Tulip Poplar behind our house. Take time to enjoy the beauty of autumn. Thanks for visiting! 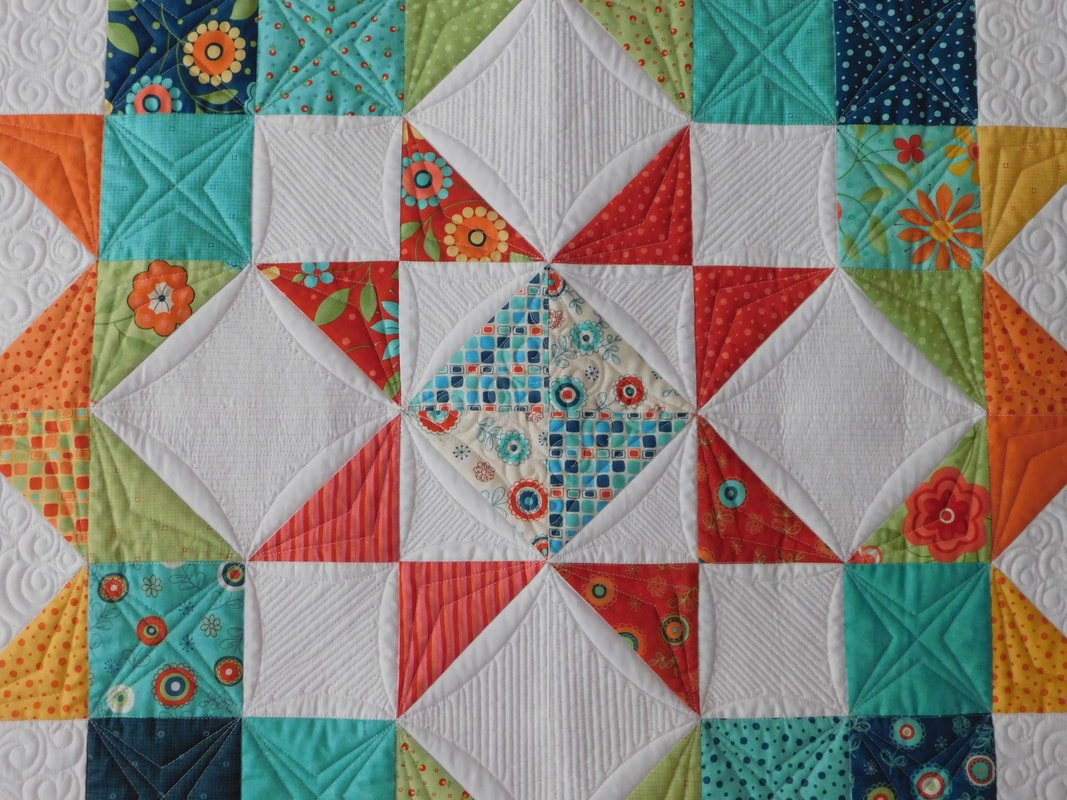 A few months ago I was talking with a friend about not having a land line telephone anymore, and the question came up: "What about the phone jack in the wall?" I told her my solution and realized that I hadn't shared my Moda Love quilt on the blog yet. 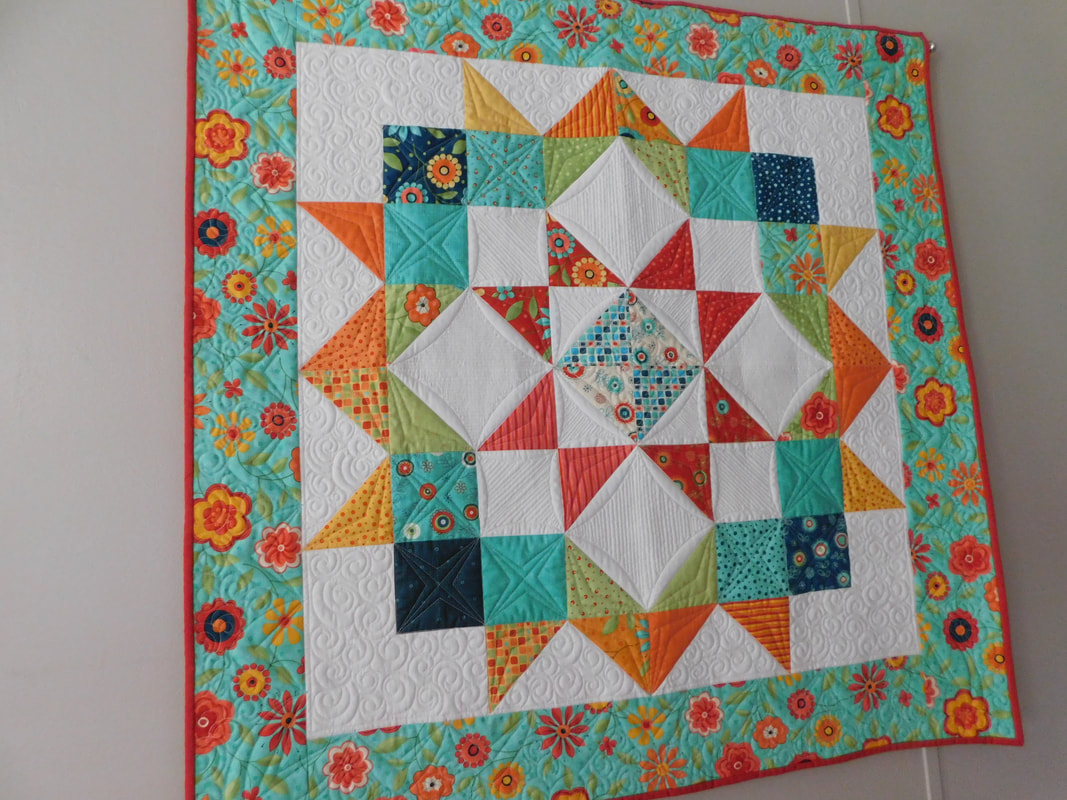 Aunt Brenda gifted to me a charm pack and some extra coordinating fabric for my birthday a few years back, and I decided to make a Moda Love quilt. The fabric line is Block Party by Sandy Gervais, and the pattern (which can be made with a layer cake, charm pack, or mini charm pack) is a free PDF document from Moda that can be found here. I sorted my 5" squares into color groupings and even used the pattern print-out as a coloring page.  This quilt is a lovely arrangement of squares and half square triangles, not too complicated but so pretty! I custom quilted it, and I love the illusion that curved quilting gives to the straight piecing in the center star. 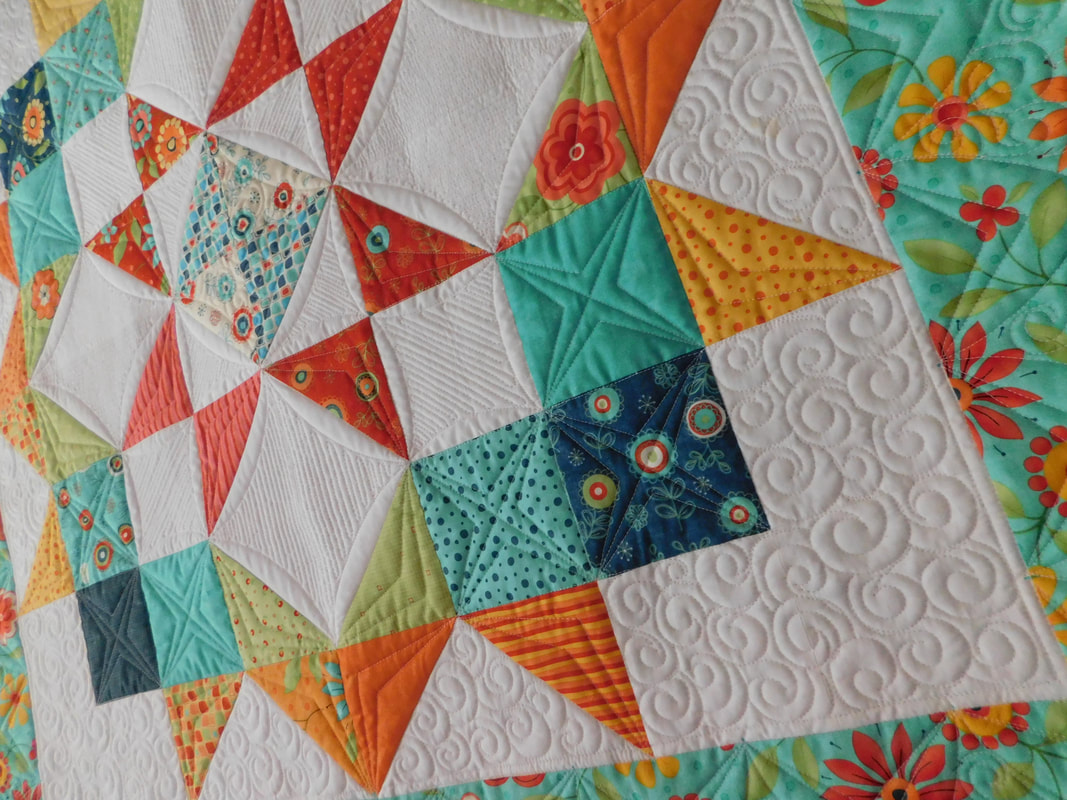 This was a project that I made just for me, but I wasn't sure where I would hang it at home. When we cancelled the land line and took the phone off the wall, I knew just what to do to eliminate that eye sore! My husband hung this quilt over it. 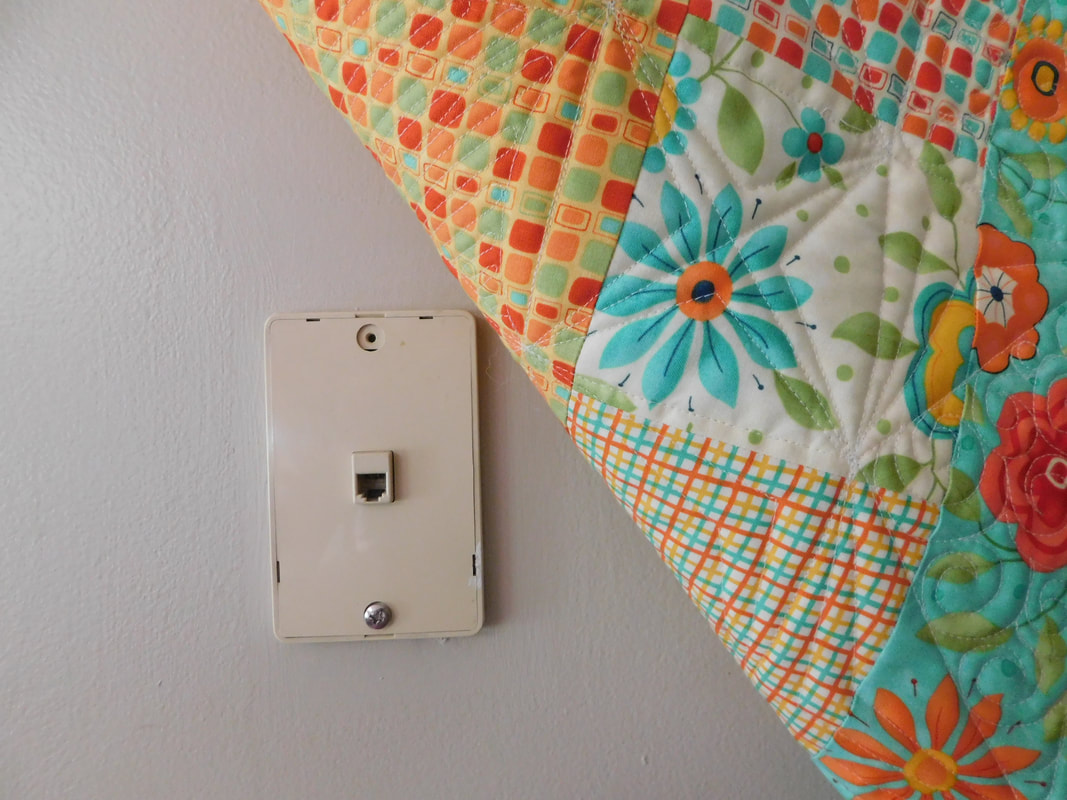 This ugly thing is still there in case we need it but out of sight, out of mind! So, if you've got something unsightly on the wall, make a pretty quilt and cover it up. Enjoy the free quilt pattern, and thanks for stopping by!
 This is a story about a very special quilt. Usually I keep this blog all about quilting with maybe just a sprinkling of personal stuff. In this post I have more personal stuff than normal to share, but let's start out with the details of this quilt.  This quilt was made for my daughter Niobe to take to college. (If you know my family, you may be thinking, "Huh?" Keep on reading for the personal stuff, remember?) Niobe chose the pattern Turnstyle designed by Amy Ellis of Amy's Creative Side. It is a really great modern design, and the pattern was written well. The blocks went together without any difficulty. Turnstyle was one of my first "pandemic quilts" of 2020. If you're a quilter, you probably have several of those yourself! I didn't have the fabric purchased yet, but superstar quilt shop owner Sarah at The Foot helped me with some virtual fabric shopping and special delivery. She chose fabrics from the shop that matched very well to the quilt on the pattern's cover photo. She did a wonderful job! 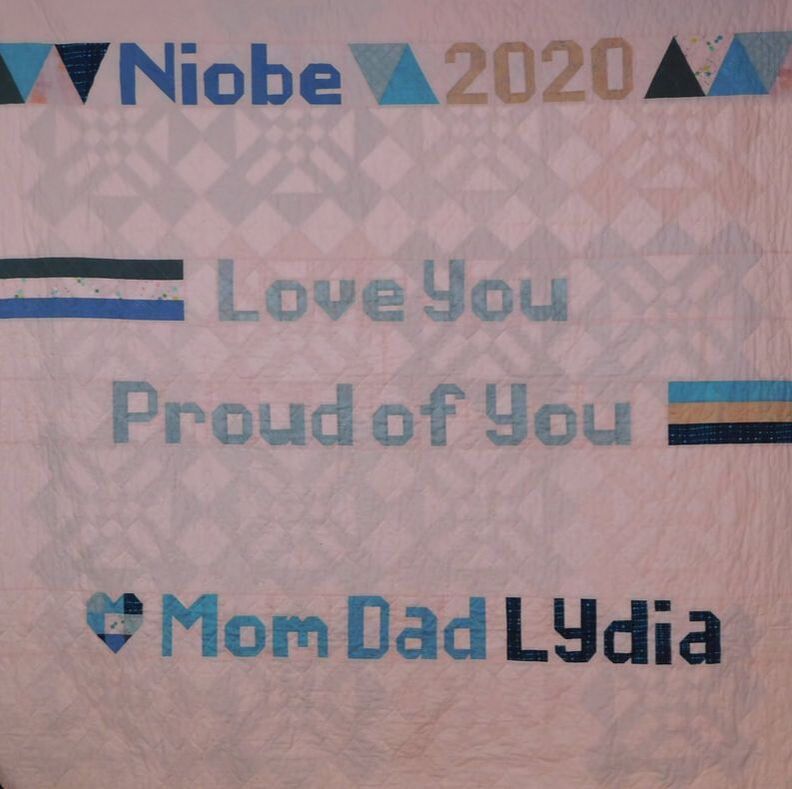 I pieced the top and wanted to do something special for the back. With the scraps we made some letters using the patterns in the book Spelling Bee by Lori Holt. I made Garry and Lydia each sew their own names so that they could be a part of creating this quilt, kind of like signing their names. Yes - they sewed the letters, and those aren't really for beginners! I quilted it with an edge to edge pattern called Chicken Wire. Niobe knew that I wasn't finished with the quilt on time to make it to college - college was virtual because of the pandemic, and she never left home. I did finish it as a surprise for Christmas. It was the best present. I thought we would gift the quilt and then put it aside with going-away-to-college stuff I'm collecting, but Niobe hasn't really let go of it since receiving it.  Niobe (pronounced Ny-O-bee, because I know you are wondering about that) is my transgender daughter who came out early in 2020. This has definitely been one of the biggest challenges we've faced as a family, but during this time nothing has been more important to me (us) than being sure that Niobe knows that she is loved no matter what. Most people didn't realize that she struggled through some dark days. Since making this change in her life, Niobe is much happier and has plenty of hope for the future. She is attending full-time college virtually at home and also has a part-time job. Niobe is a very caring, sensitive, intelligent, funny, courageous person who makes the world a better place :-) I have been thinking a lot about why I am sharing this here. I suppose because I want to encourage everyone to be kind to other people, treat them with respect, get to know someone who is different than you are. This doesn't have anything to do with politics or religion. I'm not an activist or a spokesperson, just someone who wants to genuinely care about other people, and I don't just mean people in the LGBTQ community. Take time to get to know someone before making assumptions. Try to see things from a different perspective, even if you don't agree with them. Who's right; who's wrong - does it always have to come down to that? I had - still have - a lot to learn, being the mother of a transgender person. My relationship with my daughter is not something I'm willing to sacrifice and so much more important to me than the difficulties we face. One thing I would like to share that I did not understand, and maybe you don't either, is how important it is to use the preferred name and pronoun of a transgender person. Not doing this can be very painful to them. Those words mean a lot. To be willing to change your language shows that you really care. Making this change can be REALLY HARD with someone that you've known for a long time. It will be difficult - you will feel strange - you will mess up. Just make a quick, sincere apology and move on. Take a second to think about your words before you speak them. That's always some good advice, right? If you've made it this far through this blog post, I thank you! Everything I've shared here has been approved by Niobe. If you have any questions, let's have a private conversation about it. 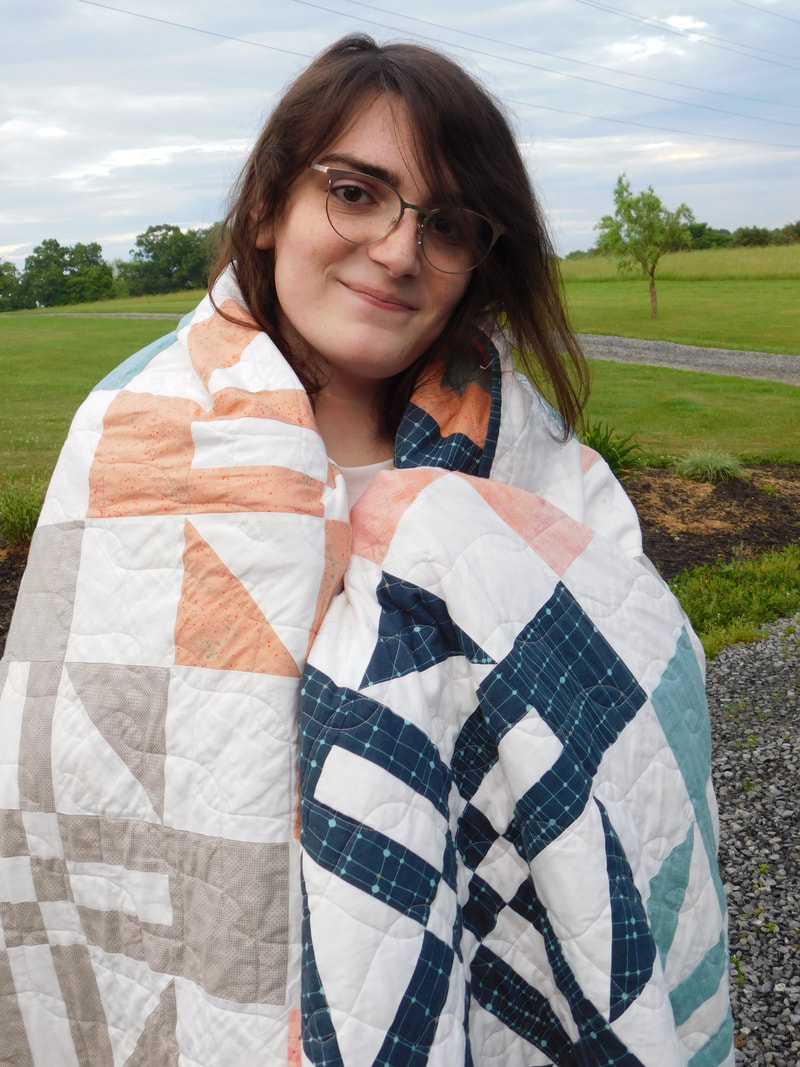 Niobe kept asking, "When are you going to put my quilt on your blog, Mom?" To her, this quilt is much more than something to keep warm with at night. I encourage you to take the time to really listen to others, get a fresh perspective, look for some common ground, care about them, love them, - maybe even make them a quilt! Thanks for visiting!
|
This is me...I LOVE to quilt, and every day I must sew for my sanity! Archives
October 2023
Categories |
 RSS Feed
